Lenovo ThinkPad is the most widely used laptop in business. The same as other computers, it provides some easy ways for users to wipe system operation if you get a blank/blue screen. So, there is no need to reinstall Windows or send ThinkPad back to the factory. Here are two way to restore Lenovo ThinkPad to factory settings without CD in Windows 7, 8, 10.
Note: Backup everything you can to other places especially drive C to avoid data loss.
When Lenovo ThinkPad laptop is not accessible, you can restore it with OneKey Recovery.
Step 1: Shut down Lenovo ThinkPad laptop then click on Novo button. Generally, the Novo button may near the power-button or in the left side of the laptop.
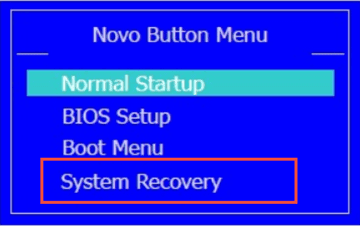
Step 2: In the Novo Boot Menu dialog, select System Recovery.
Step 3: When the OneKey Recovery window appears on the screen, select restore from initial backup or user's backup. Wait until it restores to factory reset completely, you can re-configure the settings.
If you can still access the desktop normally, you can restore Lenovo ThinkPad to factory settings via
Windows built-in features if without CD.
Step 1: Boot or reboot Lenovo ThinkPad laptop, hit F8 in the meantime to get into the Advanced Boot Options.
Step 2: Select Repair Your Computer. In the System Recovery Options window, click on System Restore and then follow the wizard to restore Lenovo ThinkPad to factory settings.
Step 1: Move your mouse to the right margin and click on Settings> Change PC Settings.
Step 2: Under the General tab, click on Get started.
Step 3: In the Reset your PC window, click Next to restore Lenovo ThinkPad to factory settings.
Step 1: Click on Start> Settings> Update & Security> Recovery> Get started.
Step 2: Select Fully clean the drive.
Note: Backup everything you can to other places especially drive C to avoid data loss.
Restore Lenovo ThinkPad to Factory Settings without CD by OneKey Recovery
Step 1: Shut down Lenovo ThinkPad laptop then click on Novo button. Generally, the Novo button may near the power-button or in the left side of the laptop.
Step 2: In the Novo Boot Menu dialog, select System Recovery.
Step 3: When the OneKey Recovery window appears on the screen, select restore from initial backup or user's backup. Wait until it restores to factory reset completely, you can re-configure the settings.
Restore Lenovo ThinkPad to Factory Settings if it is accessible
If you can still access the desktop normally, you can restore Lenovo ThinkPad to factory settings via
Windows built-in features if without CD.
Reset Lenovo ThinkPad to Factory Settings without CD Windows 7
Step 1: Boot or reboot Lenovo ThinkPad laptop, hit F8 in the meantime to get into the Advanced Boot Options.
Step 2: Select Repair Your Computer. In the System Recovery Options window, click on System Restore and then follow the wizard to restore Lenovo ThinkPad to factory settings.
Reset Lenovo ThinkPad to Factory Settings without CD Windows 8
Step 1: Move your mouse to the right margin and click on Settings> Change PC Settings.
Step 2: Under the General tab, click on Get started.
Step 3: In the Reset your PC window, click Next to restore Lenovo ThinkPad to factory settings.
Reset Lenovo ThinkPad to Factory Settings without CD Windows 10
Step 1: Click on Start> Settings> Update & Security> Recovery> Get started.
Step 2: Select Fully clean the drive.


