Temporary files exist on your computer and take up your space. Do you know how many temp files are there on your computer? We will cover two ways here to clean up the temporary files here in Windows 10/8/7.
- Way 1: How to Delete Temporary Files on Windows 10
- Way 2: How to Erase Temporary Files Using iSunshare System Genius on Windows 10/8/7
Way 1: How to Delete Temporary Files on Windows 10
It is convenient to delete the temporary files on Windows 10 computer. You can easily check what takes up disk space on your computer and free up the disk space. Here you can follow the guide to delete temporary files on Windows 10.
Step 1: On your Windows 10 computer, navigate to Settings> System> Storage. Then click the disk you want to free up space. Always we choose C drive—the system disk.
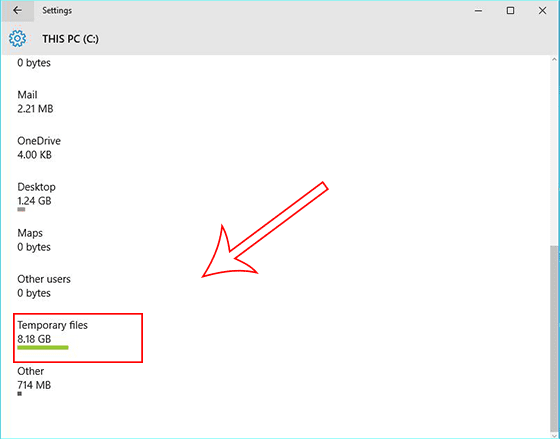
Step 2: Scroll down the mouse and check how much space the temporary files occupy. After that, click the Temporary files field to get the details.
Step 3: Now you can click the buttons here to delete temporary files, empty the download files and recycle bin.
After that, you need to confirm the operation and wait for the files to be removed from the computer automatically.
Way 2: How to Erase Temporary Files Using iSunshare System Genius on Windows 10/8/7
There is also an easy way to check and delete the temporary files and other junk files from the computer. You can try the Windows cleanup software—iSunshare System Genius. It allows you to clean junk files and registry entries safely and efficiently. You can directly download it from here.
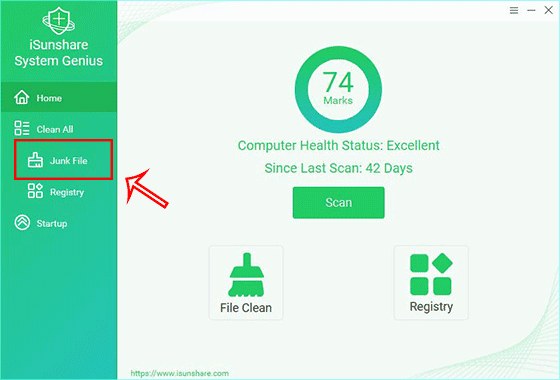
Step 1: Open iSunshare System Genius and you can see the marks for your computer health if you used it before. For the first time users, they have 3 days for a free trial. Next, you need to click Junk File on the left panel.
Step 2: The scanning process starts as long as you click the Scan button on the interface. The quick scan for the junk files won’t take too long to complete.
Step 3: After the scan, click the Clean button on the top right panel. You can also preview and select files to delete from the scan result according to your needs.
Step 4: Click the OK button and the temporary files are erased from the computer. You will get more using space.
Related Articles:
- 4 Ways to Delete Temp Files in Windows 10
- Solved—You Are Running Out of Disk Space on Windows Computer
- 4 Ways to Fix Disk Cleanup Not Working in Windows 10
- How to Make Windows Computer Faster or Perform Better


