Quantcast
Channel: Password Recovery Ways|Tips
Viewing all 125 articles
Browse latest View live

How to Permanently Delete Files from Hard Drive Windows 10

$
0
0
When you press the Delete key to remove files from Windows 10 computer, it does not disappear from your hard drive at once. It goes to the recycle bin. Even you empty the recycle bin, it still exist on somewhere of your hard disk and you can use the data recovery software to restore it if needed. Whether you are going to delete the sensitive financial files, business documents, or privacy photos, confidential contact data and so on, you are bound to make them private and do not want others to get on hand through recovering. Therefore, how can we delete data from hard drive permanently and securely? Here you will get the answer. 

Software to Permanently Delete Files/Data from Hard drive 

According to the information above, the easiest and fastest way is to find the software to permanently delete files/data from hard drive. iSunshare File Deletion Genius offers users this feature to remove files from Windows 10/8/7 computers completely , which cannot be recovered any more. 


This software supports you to delete all kinds of files: Word document, Excel sheet, Text file, images and videos etc. Here we will take Windows 10 computer as an example and show you the steps to completely delete files/data from hard drive. 

Step1: Install and run File Deletion Genius 

Download File Deletion Genius from iSunshare website and complete the installation process. Double click to open the software. 

run File Deletion Genius


Step 2:  Import the files to delete forever. 

You can click the Add button to select the files from the drive. Of course, you can delete all files of one drive. You just need to find and check the files, then click the OK button. Or you can directly drag and drop it into the program. For the free trial users, they can only add 10 files to delete. 

import the files to delete permanently


Step 3: Choose Slow Mode and click the Delete button. 

The Slow Mode is chosen by most people because it can erase the data more completely. 

choose slow mode and click Delete


Step 4: Get the warning box and click OK to continue. 

Here, it is better for you to further check whether the files are those you want to delete permanently. If you delete the files with this confirmation, you cannot recover it with any way. 

click OK on warning box


After that, you will not find those files on your Windows 10 computer.  And your entire secret will go with the deletion.  For those who delete all files on the whole partition, they can also format the partition to protect files from recovery. 

Related Articles:

  1. 3 Ways to DeleteFiles without Sending to Recycle Bin in Windows 
  2. How to Delete Undeletable Files within 3 Steps 
  3. How to Make Deleted Files Unrecoverable in Windows 10
  4. Reliable 3 Ways to Force Delete Files in Windows 10 
  5. How to Recover Files from Broken Toshiba External Hard Drive  


How to Copy/Clone Windows Operating System to New Hard Drive

$
0
0

I want to copy my Windows 7 operating system to a new hard drive. Although now Microsoft does not update Windows 7, I get used to it and want to continue using it in the new hard drive. Is it possible to clone all configurations to the new hard drive and make my PC boot from it?”

When we get used to the old computer with all applications installed, we prefer to keep using it. Yes, you can buy a hard drive with desirable storage space and copy all Windows system settings to it. Also, you can copy other data from the old hard drive to the new hard drive so that you get the same working environment after replacing the hard drive.

Everyone knows that it is impossible to move or transfer the Windows system by simply Ctrl + C and Ctrl + V. If you are going to copy/clone Windows operating system to a new hard drive, you had better download the Windows system clone software which has an intuitive interface and simple steps. iSunshare CloneGo is such the software which enables you to transfer Windows OS to new hard drive with few clicks.

clone Windows OS to new hard drive with CloneGo


How to Clone Windows OS to New Hard Drive

As the most important preparations, you need to download CloneGo on your computer and complete the installation process in advance.

Step 1: Launch CloneGo and specify C drive as the source target. And then select your new hard drive as the destination target. The C drive is the current Windows system partition on your computer.

select source target and destination target

Step 2: Click “Start” and you will get the notice to allocate a new FAT partition for the new hard drive. Click “OK” to go ahead.

click Start and allocate FAT partition


Step 3: After that, your hard drive will have a FAT partition. And you need to click “Start” again and get the format notice. Click “OK” to continue.

click Start and get format notice


Step 4: After the copy process is completed, you will get the successful inform. Then, you can reboot your computer form your new hard drive.

complete Windows system cloning

You can repeat these steps to clone other data partition from the old hard drive to new hard drive. After cloning, you can shut down the computer and remove the old hard drive. In the end, install the new hard drive into the computer.

Notice:
  1.          You need to initialize the new hard drive before running CloneGo.
  2.       The new hard drive should have larger space to receive the Windows system data.
  3.       If you want to clone all data from the old hard drive, it is better for you to add multiple volumes to the new hard drive as the copy operation will format the destination target.

Related Articles:


How to Unlock iPhone if You Forgot the Passcode

$
0
0

“My sister forgot her iPhone 7 Plus screen passcode and cannot use the phone. I search online and found there is no way to bypass iPhone locked screen without data loss. So, how to unlock forgotten password on iPhone?”

How to unlock iPhone if you forgot the passcode


Just as what you asked, you cannot find a way to unlock iPhone if you forgot the password with no data loss. When you cannot get into the disabled iPhone for entering the wrong passwords so many times, it is time to remove the forgotten passcode from the iPhone. How can you do that? Here we will share you two ways to unlock iPhone if you forgot the passcode.


Way 1: Bypass iPhone Locked Screen with iPhone Passcode Genius

iPhone Passcode Genius is the newly developed iPhone password tool that enables users to unlock iPhone with various locks. This tool is designed with the intuitive interface and users can remove the lock screen, Apple ID and screen time passcode instantly when they forgot the password.  No matter the iPhone is old, disabled, second-hand, and screen-broken or screen replacement, users can utilize this tool to have it unlocked.


Step-1: Run iSunshare iPhone Passcode Genius and select Unlock Lock Screen from the interface.

choose Unlock Lock Screen


Step-2: Build up the connection between the iPhone and your PC. Then click Start> Next in the coming interface.

Click Start to unlock iPhone


Step-3: After the software loads all your iPhone information, you need to download the firmware package online by clicking “Download”.  Or if you have downloaded this package on your computer, you can click “Select” to add it.

Get the firmware package


Step-4: After the verification, the software will guide you to the unlock interface. With a simple click on “Unlock”, you will be on the passcode removing process.


verifu success and click Unlock


Step-5: The software made your iPhone unlocked successfully. And you can set up new settings for iPhone as the data has been erased.

Unlock iPhone successfully


Way 2: Restore Forgotten Passcode iPhone via iTunes

If you have used iTunes to sync iPhone on the computer, you can restore iPhone with iTunes.

Step-1: Connect iPhone to the PC and run iTunes.

Step-2: In iTunes, click the iPhone icon and choose Summaryat the left menu.

Step-3: Click “Restore” or "Restore iPhone" and follow the instructions to finish the process.

Notes:  The iPhone that has Find My iPhone turned on cannot be restored by iTunes.

restore iPhone via iTunes


Related Articles:
  1. 4 Ways to Unlock a Disabled iPhone without Passcode
  2. How to Unlock iPhone without Passcode or Siri
  3. How to Unlock a Second-Hand iPhone X without Passcode
  4. How to Recover iPhone 6 Lost Backup Password  


The Fast Way to Get Rid of iPhone Disabled without iTunes

$
0
0

“I entered several passcodes into the iPhone X and made it disabled now. No right passcode is known because it is my late father’s iPhone. How can I get rid of iPhone disabled without iTunes? I know nothing about this iPhone.”

get rid of disabled iPhone without iTunes


If the iPhone is disabled for the unknowing passcode, and you know nothing about the iPhone details (Just as the example the iPhone belongs to his late father), how to get rid of iPhone disabled? Of course, without iTunes, you cannot restore the iPhone to make it unlock. In this situation, you need to find the professional iPhone unlocking software for help.

iPhone Passcode Genius— Good Choice to Unlock Disabled iPhone

iPhone Passcode Genius is developed by iSunshare to help iPhone users remove the passcode in several situations. It is designed with the intuitive using interface so that everyone can make good use of it without technical skills.  It can be used to remove disabled iPhone passcode in iPhone 4/5/6/6s/7/7s/8/8s/X/XS/XR/XSMAX. Besides, you can also utilize this tool to remove the Apple ID and screen time passcode when you forgot the passcode.


Steps to unlock disabled iPhone without iTunes

First of all, although we do not use iTunes to restore the disabled iPhone, it is necessary to get the latest iTunes installed on the computer.

Step-1: Download iPhone Passcode Genius from iSunshare official website. Then double click to run the program and follow the instructions to install it on your computer.

install iPhone Passcode Genius


Step-2: Open the software and connect your disabled iPhone to the computer. After that, you will see three options on the home interface. In order to unlock the disabled iPhone, you should choose “Unlock Lock Screen”.

select Unlock Lock Screen


Step-3: On this interface, it lists several situations that you would need to unlock the lock screen. You can view it and then click the “Start” button.

Click Start


Step-4:  If your iPhone is not right connected, you will see the interface that tells you to make sure the iPhone is connected to PC.  You should connect your iPhone again and click “Next”.

Click Next


Step-5: Then you will go into the firmware download interface. Most people click “Download” to get the firmware package. If you have downloaded it before, you can click “Select” button to add it.

download firmware package for iPhone


Step-6: Next, you get the last step to click “Unlock”. After that, the software will remove the locks from your iPhone automatically, including the 4/6 digits passcode, Face ID and touch ID. You will get a new iPhone in the end.

Click Unlock


Related Articles:

  1. How Do I Remove an Apple ID from My iPhone
  2. I Forgot My Screen Time Password on iOS 12 iPhone-What to Do
  3. Top 3 Ways to Fix iPhone Locked up after Update
  4. How to Unlock iPhone If You Forgot the Passcode 


How to Disable Screen Time on iPhone iOS12 without Passcode

$
0
0

Screen time limitation prevents you from being addicted to your iPhone. But when you forgot the screen time passcode, how to disable/turn off/get rid of this restriction on iOS 12 iPhone? You can make it done with iSunshare iPhone Passcode Genius. Here you will get the step by step tutorial to remove screen time passcode.

disable screen time on iPhone iOS12 without passcode


About iSunshare iPhone Passcode Genius

This iPhone password remover helps users to get rid of the passcode forgotten issues with three modules: Unlock Lock Screen, Remove Apple ID, and Remove Screen Time Passcode. Besides, you can make good use of iPhone Passcode Genius to hard reset the iPhone.

As for the screen time passcode forgotten issues, iPhone Passcode Genius can help to remove the restriction password only on iOS 12 iPhone.  What’s more, there is no data loss during all processes.


Tutorial to turn off screen time on iPhone without passcode

Step 1: Get the latest iTunes installed on your Windows PC and connect your iPhone to the PC. Besides, download and install iSunshare iPhone Passcode Genius from the official website.

Step 2: Start the software and choose “Remove Screen Time Passcode”.

click Remove Screen Time Passcode


Step 3: In this interface, you will view your iPhone device type. There is a Start button in the middle of the interface. You can click it to remove the screen time passcode instantly.

Click Start to remove screen time passcode


If the Find My iPhone function is turned on, you should disable it first.

disable Find My iPhone


Step 4: Wait for the process to end.  When it completes successfully, you will get the successful window. Then you remove the screen time password and can turn off the screen time easily.

remove time passcode process


External tips: How to turn off Screen Time with Password

If you have the password, it is much easier to turn off/ disable the screen time. You just need to access Settings and find the Screen Time option. Tap it and choose Turn Off Screen Time Passcode from the pop-up window. After that, you need to enter the password to make the screen time limitation removed.

turn off screen time passcode


Related Articles:
  1. iOS 12: How to Turn off Parental Controls on iPhone without Password
  2. Troubleshooting Guide - Touch ID Not Working on iPhone or iPad
  3. How to Unlock iPhone to Use USB Accessories If Forgot Password
  4. How to Unlock iPhone if You Forgot the Passcode


How to Change Apple ID on iPhone without Password

$
0
0
What’s Apple ID? It is the identity for you to use any app or service developed by Apple, such as iCloud, iTunes, App Store on iPhone. To activate your iPhone, you need to enter the right password and Apple ID account. What if you want to get rid of the previous Apple ID on your second-hand iPhone, how to do? How to change the Apple ID on iPhone without password? Here we list 2 solutions for this issue.

Solution 1: Change Apple ID on iPhone without Password with third-party tool

With the password, you cannot sign out of the old Apple ID and register your new one. But the iPhone password unlock software can help you do this. iSunshare iPhone Passcode Genius is one such tool that helps to remove Apple ID from iPhone without the password. It can erase all the related data with that Apple ID and give you a fresh iPhone.  This software supports almost all iPhone: iPhone 4/5/6/7/8/X series phones.

Step 1: Launch iPhone Passcode Genius and connect iPhone to your Windows PC. Remember, you should download and install iTunes on the computer before.

Step 2: Tap the screen passcode and choose the “Trust” option on your iPhone.

Step 3: On iPhone Passcode Genius interface, choose “Remove Apple ID” from the three modules.

select remove Apple ID


Step 4: Then, you will be displayed the Remove Apple ID interface.  You just need to click the Start button.

click the Start button


If the Find My iPhone function is disabled by the previous owner, you will get the Apple ID deleted immediately.

remove Apple ID directly


If Find My iPhone function is still turned on, you should take your iPhone and access Settings and search Find My iPhone to disable it. After that,  iPhone Passcode Genius will work for you to remove the used Apple ID.

remove Apple ID after changing the settings


Step 5: After a few minutes, you will get the successful information. Next, you can disconnect the iPhone and set your new Apple ID to the iPhone and get it activated.

remove Apple ID successfully


Solution 2: Remove Apple ID by Entering Recovery Mode

You can reinstall iOS on your iPhone in recovery mode. But sometimes, you will get stuck in recovery mode. Think twice before you make use of this method.

Step 1: Turn off the iPhone and make it power off.

Step 2: Press the related button to make your iPhone entering recovery mode while connecting it to PC.  You can refer to the images below to find the right button.

buttons to enter recovery mode for iPhones


Step 3: You will get a window on the computer soon. It tells you “There is a problem with the iPhone that requires it to be updated or restored”.  Click Restore and go ahead.

Click Restore option


Step 4: In the next window, it will remind you that this operation will cause the loss of iPhone data. Click the “Restore and Update” to continue.

click Restore and Update


Step 5: In the end, you will get the iPhone to be restored to the factory setting.  And it is power cycle. After that, you can change the Apple ID to yours. 

iPhone is restored successfully


Related Articles:
  1. The Fast Way to Get Rid of iPhone Disabled without iTunes
  2. How to Remove Apple ID without Password from iPhone
  3. Solved - iTunes Could Not Restore iPhone Because of Password Was Incorrect


How to Make Google Chrome Faster on Windows 10

$
0
0

Google Chrome is an important web browser widespread used by people all over the world because of its high browsing speed, quick response and user-friendly interface. However, many users complain that Google Chrome becomes slower than before over a period of time due to multiple reasons. Despite all this, you can make Google Chrome run faster by the following simple ways. Look at here and learn How to MakeGoogle Chrome Faster on Windows 10.

make google chrome faster


Way 1: Close Unnecessary Tabs from Google Chrome

If you open too many tabs, Google Chrome will be put under too much pressure and need to work harder than usual. Then the browsing speed will be slowed down. So in order to speed up Chrome browser, it is recommended to close some unnecessary tabs or the tabs that you don’t need any more to relax your Google Chrome. You just need to click the “X” button behind each tab and only open the tabs that you require.

Way 2: Update Google Chrome to the Latest Version

If you are running an older version of Google Chrome, it definitely won’t work as fast as that in a latest version. So if you want to make Chrome run faster, you’d better make sure that you’re using the latest version of Google. Normally Google Chrome automatically updates itself to the latest version in the background when you close and reopen your computer's browser. But just in case, you should have a check.

Step 1: Launch your Google Chrome, enter chrome://helpin the search bar to go to Chrome help section.

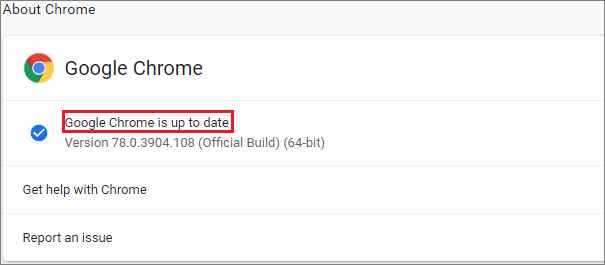
Step 2: Then you can check for update. Google will detect whether an update is available or not. If it is available, Google will update itself to the latest version automatically. If you are told Google Chrome is up to date, it means that your Google Chrome has already been updated.

Step 3: Relaunch it to check if the browsing speed becomes faster than before or not.

check Google Chrome for update


Way 3: Turn Off or Remove Some Unwanted Extensions

What is Extension? Extensions refer to small programs which can be added to Chromeand let you do more. In order to improve Google Chrome performance and speed up page loading, you can turn off or delete some unwanted extensions from Google.

Step 1: Open Google Chrome on your computer.

Step 2: Go to the three dots at the top right of the interface and then click More tools>Extensions.

Step 3: Then you can choose to disable the extension or click the Remove button to delete unwanted extensions.

turn off extension


Way 4: Stop Unwanted Tasks from Task Manager

There may be many unwanted tasks running on your Google Chrome which occupies a lot of resources but you don’t know or you just ignore this point. This will also slow down your Google Chrome’s performance. You need to stop them to speed up your browser.

Open your Google Chrome, go to the three vertical dots>More tools>Task Manager, select the tasks that you want to stop, and then click End process.

stop unwanted tasks


Way 5: Use a Prediction Service to Load Pages More Quickly

There is another tip on how to speed up Google Chrome on Windows 10. That is to turn on network action predictions, which can make Google Chrome open webpages faster.

Step 1: Click the three vertical dots at the top right corner and then choose Settings.

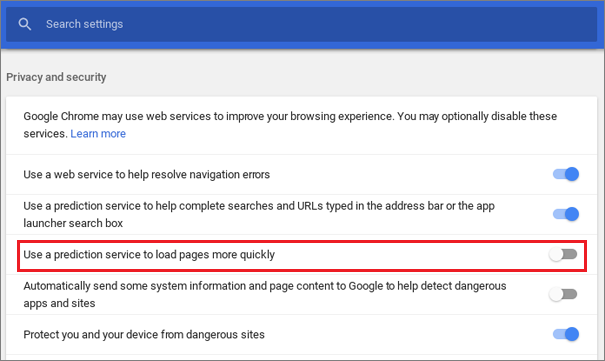
Step 2: Expand Advanced in the left panel, select Privacy and securityand turn on Use a prediction service to load pages more quickly.

use prediction service to load pages


Way 6: Clear Chrome Cache and Browsing Data

You need to regularly clear Chrome cache and browsing data to maintain a good performance. Here is the guidance:

Step 1: Enter chrome://settings/clearBrowserDatawith your browser.

Step 2: Then the window of “Clear browsing data” will pop up. You can set the Time range to All time to clear more data and then click Clear data.

clear chrome data


Step 3: Restart the Chrome to check the changes.

When you find your Google Chrome has slowed down, you can clean up computer to check if there is any harmful software on your computer and remove it in order to speed up your Chrome. And you can also choose to reset your browser to the default settings to fix the issue. No matter which way you select, first of all launch your Google Chrome, click More (the three vertical dots)>Settings>Advanced>Reset and clean up. And then go on Way 7 and Way 8.

Way 7: Find and Remove Harmful Software on Your Computer

To find and remove harmful software for your computer, you should:


Step 1: Under the section of Reset and clean up, choose Clean up computer.

choose clean up computer


Step 2: Click the Find button so that Chrome can find harmful software on your computer and remove it.

click the Find button


Step 3: Then Google Chrome will start to check for harmful software for your computer. If there is no malware, you will be prompted “No harmful software found”. If some malwares are found out, click Remove to remove them.

Way 8: Return Google Chrome to the Default Settings

To restore Google Chrome settings to their original defaults, you should:

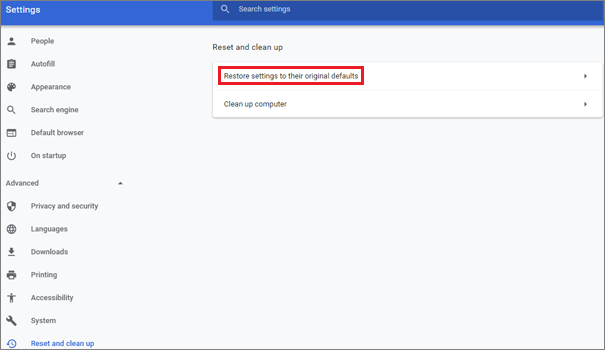
Step 1: Click the option of Restore settings to their original defaults under the part of Reset and clean up.

restore settings to their original defaults


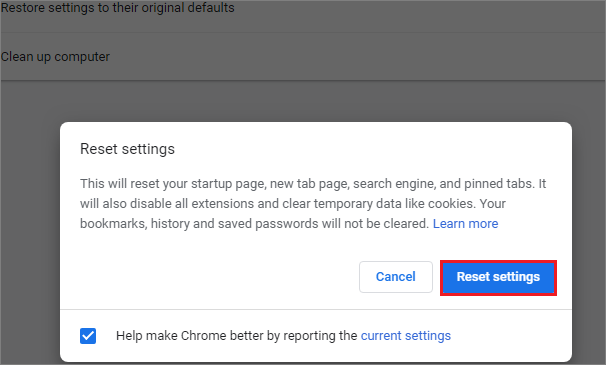
Step 2: Click Reset settings to confirm to reset the Google Chrome.

click Reset settings


Related Articles:
  1. How to Lock Google Search Engine Home Page
  2. 6 Ways to Speed up Google Chrome
  3. How to Fix Google Chrome Not Responding in Windows 10
  4. Fixed-Chrome Sync Bookmarks Not Working 


BitLocker for Mac-Access BitLocker Drive on Mac 10.15 Catalina

$
0
0
Apple recently released its new version Mac 10.15 Catalina with more intelligent features, such as the security feature. To protect the users’ privacy, they need to add applications to access data.  And for the BitLocker drive, it is not readable on Mac 10.15 Catalina by default. How can you access the BitLocker drive on Mac computer? You will get the solution here.

Bitlocker for Mac


Does BitLocker work on Mac?

By default, BitLocker encrypted drive only can be opened on Windows with the password and recovery key file. Mac does not provide the solution to enable this feature. And when you check in Disk Utility, the BitLocker drive is detected by the computer, but you are unable to open, view, edit or transfer files on it.

Is it possible to access BitLocker drive on Mac?

Yes, of course. There are some applications that can help you to make the BitLocker drive readable on Mac, especially the Mac 10.15 Catalina. But you need to make sure that the BitLocker drive is healthy and you have the password/recovery key. Otherwise, there is no way to help you with this issue.

About BitLocker for Mac application—BitLocker Genius

As a matter of fact, BitLocker for Mac application/software works as the agent that helps to build the connections between the encrypted drive and Mac, which enables you to mount Windows BitLocker encrypted drives on Mac. Considering the safety, the software supports you to open, read, and write the BitLocker encrypted drive after you enter the right passcode or recovery key. iSunshare BitLocker Genius is such a tool that helps you to open BitLocker protected external hard drives, USB pen drives, SD cards and etc.

How to Access BitLocker Drive on Mac 10.15 Catalina Computer

Step 1: Installed BitLocker Genius on the Mac computer. You can get it from here.

Step 2: Inject the BitLocker Drive into Mac and Ignore the pop-up box that tells you “the disk you inserted was not readable by this computer”.

ignore the unreadable message


Step 3: Click System Preferences and choose Security & Privacy > Privacy >Full Disk Access. Then you can click the plus sign to add iSunshare BitLocker Genius into the list to get authorization to access the data on Mac 10.15 Catalina.

make BitLocker Genius recognize BitLocker drive


Step 4: Launch BitLocker Genius and then select the drive with BitLocker mark and click the Unlock button on the navigation toolbar.

choose the BitLocker drive to unlock


Step 5: Next, you can choose to enter the password to unlock the drive. Or you can use the recovery key file to decrypt the drive. No matter which option you choose, you need to click the Mount button in the end.

two ways to unlock BitLocker drive on Mac


Step 6: After that, your BitLocker drive is unlocked and you can see it on the desktop. Now, it is convenient for you to read, edit and transfer files between drive and Mac.

BitLocker drive is accessible on Mac Catalina


Tips: If you want to disconnect the drive, you need to click the Eject button on the navigation toolbar. In this way, the BitLocker drive data will be protected safely. 

Related Articles:
  1. How to Open BitLocker Encrypted Drive in a Different Computer
  2. How to Password Protect a USB Flash Drive with BitLocker on Windows 10
  3. Solved-BitLocker is Missing from Control Panel in Windows 10 


How Do I Get Rid Of Someone Else’s Apple ID on My iPhone without Password?

$
0
0

“Considering the budget, I got a second-hand iPhone 8 online. However, I found that the original Apple ID is still associated with the iPhone so that I cannot update apps on the app store. How do I get rid of someone else’s Apple ID that is not mine?”
get rid of someone else's Apple ID on my iPhone without passcode


Yes, when you update the app and it asks for the password for the previous Apple ID account, there must be an App that is downloaded with that person’s Apple ID. And it is obvious that the person does not remove all apps and data from your iPhone.  In this situation, you are not in full control of the iPhone. What you need to do is remove the Apple ID from the iPhone without the previous owner’s password. You can try the method below.

How to Remove Apple ID from iPhone without Password after Restore

What you need is a tool named as iSunshare iPhone Passcode Genius. This software is capable of removing Apple ID easily within simple clicks. To use iSunshare iPhone Passcode Genius, you do not need any special technical skills. What will happen if you use iSunshare iPhone Passcode Genius to get rid of someone else’s Apple ID? All the data in the iPhone will be erased and you can activate the iPhone with a different Apple ID or create a new iCloud account to enjoy all Apple services. Of course, it is convenient for you to purchase and download games and apps from the iTunes store because there is only your Apple ID linked to the iPhone.

Step 1: After launching iSunshare iPhone Passcode Genius, you can select the Remove Apple ID mode.

select Remove Apple ID

Step 2: Connect your iPhone to the computer. Then enter the screen passcode and click “Trust” option on the iPhone.

enter screen passcode and trust your computer


Step 3: Click “Start” to remove Apple ID. If the Find My iPhone feature is already disabled on the iPhone, the program will start removing the Apple ID immediately.

remove Apple ID without Find My iPhone on


If Find My iPhone is on, you need to reset all setting on iPhone. Then the software will help you to remove the Apple ID instantly.

remove Apple ID with Find My iPhone on


Step 4: Just in a moment, you will get the iPhone associated Apple ID removed successfully.

Remove Apple ID successfully


Related Articles:


How to Quickly Remove Temporary Files from Windows 10/8/7

$
0
0

Temporary files exist on your computer and take up your space. Do you know how many temp files are there on your computer?  We will cover two ways here to clean up the temporary files here in Windows 10/8/7.

  • Way 1: How to Delete Temporary Files on Windows 10
  • Way 2: How to Erase Temporary Files Using iSunshare System Genius on Windows 10/8/7
remove temporary files from Windows 10/8/7


Way 1: How to Delete Temporary Files on Windows 10


It is convenient to delete the temporary files on Windows 10 computer. You can easily check what takes up disk space on your computer and free up the disk space. Here you can follow the guide to delete temporary files on Windows 10.

Step 1: On your Windows 10 computer, navigate to Settings> System> Storage.  Then click the disk you want to free up space. Always we choose C drive—the system disk.

access storage on Windows 10


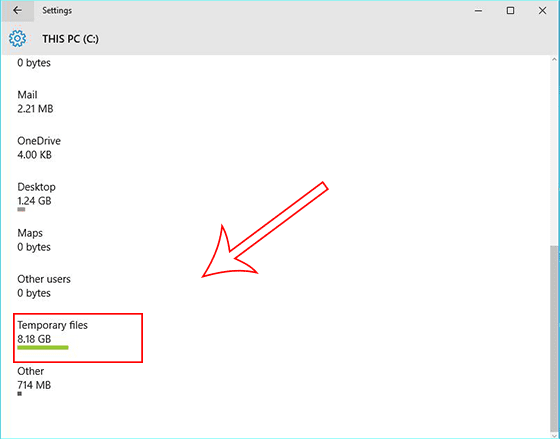
Step 2: Scroll down the mouse and check how much space the temporary files occupy.  After that, click the Temporary files field to get the details.

click Temporart files


Step 3: Now you can click the buttons here to delete temporary files, empty the download files and recycle bin.

delete temporary files


After that, you need to confirm the operation and wait for the files to be removed from the computer automatically.


Way 2: How to Erase Temporary Files Using iSunshare System Genius on Windows 10/8/7


There is also an easy way to check and delete the temporary files and other junk files from the computer. You can try the Windows cleanup software—iSunshare System Genius. It allows you to clean junk files and registry entries safely and efficiently. You can directly download it from here.

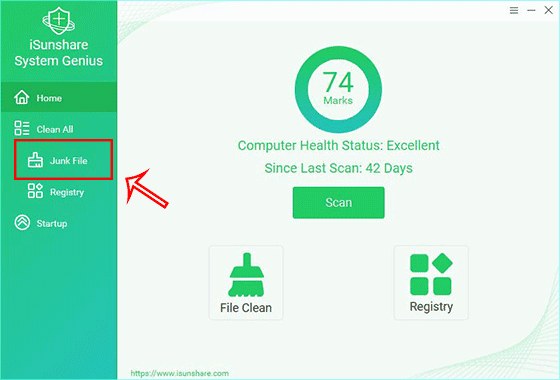
Step 1: Open iSunshare System Genius and you can see the marks for your computer health if you used it before. For the first time users, they have 3 days for a free trial. Next, you need to click Junk File on the left panel.

click Junk File


Step 2: The scanning process starts as long as you click the Scan button on the interface. The quick scan for the junk files won’t take too long to complete.

scan computer junk files


Step 3: After the scan, click the Clean button on the top right panel. You can also preview and select files to delete from the scan result according to your needs.

clean all junk files from computer


Step 4: Click the OK button and the temporary files are erased from the computer. You will get more using space.

delete junk files finished


Related Articles:

  1. 4 Ways to Delete Temp Files in Windows 10
  2. Solved—You Are Running Out of Disk Space on Windows Computer
  3. 4 Ways to Fix Disk Cleanup Not Working in Windows 10
  4. How to Make Windows Computer Faster or Perform Better


How to Clean Registry on Windows Computer or Laptop

$
0
0

Does your computer have the unused and invalid registry entries? How can we find and clean them at ease?  Yes, we can manually go to the Windows Registry Editor and then clean the registry entries.  But it is time-wasting and needs patience.  Here we will introduce an extremely easy way to clean registry entries on Windows 10/8/7 computers and laptops.  You can use the registry cleaner tool—iSunshare System Genius to do the cleaning.

clean registry entries on Windows


Why choose iSunshare System Genius – registry cleaning tool?

iSunshare System Genius is the powerful registry cleaning tool that helps you to detect the invalid registry entries and clean them effectively. You can get the invalid software information details and delete them in minutes.  You can use this software to clean the registry from time to time to keep an excellent performance of the system.

iSunshare System Genius supports both Windows computers, regardless of the computer brand. Also, you can download and free try it from the official website. This cleaning tool can also clear the junk files to get more usable space. Let’s see how iSunshare System Genius works.


How to Clean Registry on Windows computer or laptops

Step 1: Download the program from iSunshare official website and finish the installation on your Windows computer.  Then, start the computer and click the “Registry” icon from the left side of the panel.

click registry options


Step 2: Click the “Scan” button on the center and wait for the result.

scan the registry entries


Step 3: After the scanning process ends, you can view how many categories it checks and how many items you can delete.  Also, you can click the “Clean” button to remove those registry entries from the computer.

clean all detected registry entries


In addition, you can click the category and deep into the files information. Then, you can click the items in this category by clicking the “Clean” button on the top right corner.

invalid software registry entries details


Step 4: Finally, click the “OK” button and then close the software.

complete registry cleaning


Conclusions:

Registry keys play an essential part in the system functions and operations. Therefore, you are taking risk to delete the registry entries manually if you have no professional knowledge. Why not choose a safer way to clean the registry and free up space? iSunshare System Genius is a good choice for you.

Related Articles:
  1. Solved—There is Not Enough Memory Or Disk Space Error inWord
  2. How to Check What is Taking Space on My Hard Drive in Windows 10
  3. 6 Suggestions to Speed Up a Slow Asus Laptop 
  4. [Fixed] Not Enough Disk Space for Windows 10 Update 


How to Prevent Programs from Opening on Windows Startup

$
0
0

It is obvious that more software you install and make it startup on Windows launching, the longer it takes to boot up Windows.  To get a faster boot, you need to turn off the unnecessary auto startup programs in Windows.  Now we will deep into this issue in Windows 10/8/7/Vista/XP.
  • Part 1: How to prevent programs from opening on startup Windows 7/Vista/XP
  • Part 2: How to turn off auto startup programs in Windows 10/8/8.1
  • Part 3: Fast way to stop programs from opening on Windows 10/8/7/Vista/XP startup
prevent programs from opening on Windows startup


Part 1: How to prevent programs from opening on startup Windows 7/Vista/XP

For Windows 7/Vista/XP users, they can prevent programs from opening on startup with MSConfig.  But you need to be careful when you are using msconfig.exe. Here I will take Windows 7 as an example to display the steps.

Step-1:  Click the Start menu and search “msconfig.exe” on the box.  Then click the msconfig.exe. (For Windows XP users, they need to open the Run box from the Start menu and then enter “msconfig.exe” in the box and click OK to run.)

search msconfig


Step 2: In the System Configuration window, you need to click the Startup tab. To prevent a program from opening on Windows startup, you need to tick the check box next to the program and then click the Apply and OK button.  No matter what you choose, Windows will boot faster next time.

tick app to disable in Windows 7


Step 3: A prompt will pop out to tell you that you may need to restart your computer to apply these changes. You can click the Restart button instantly. If you do not want to restart now, you can click the Exit without restart button.

restart to apply the change or not


Part 2: How to turn off auto startup programs in Windows 10/8/8.1

For Windows 10/8/8.1 users, it is much easier for them to turn off the auto startup programs.  The Task Manager is easy to handle by everyone.

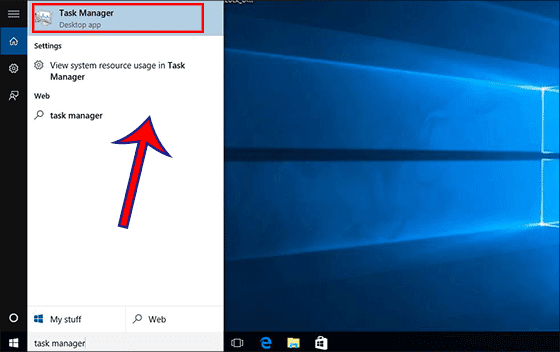
Step-1:  In Windows search box, type “task manager” and then click Task Manager app from the result.

search Task Manager in Windows 10


Step-2: Click More details to get more settings in the Task Manager window.

click More details


Step-3:  Switch to Startup tab and you can view the programs that load on Windows startup. Then, you can select the app and click the Disable button on the bottom right. In this way, the app will not run in the background while Windows system launches.

prevent prorgams from opening in Task Manager


Part 3: Fast way to stop programs from opening on Windows 10/8/7/Vista/XP startup

 In Windows 7/Vista/XP, you need to enter the System Configuration utility to manage the auto startup programs. But for Windows 10/8/8.1, you can easily change the startup apps via Task Manager.  Now no matter which version your computer runs, you can use iSunshare System Genius to stop programs from opening on Windows startup.

iSunshare SystemGenius is the easy-to-use software that supports to work on almost all Windows versions, including Windows 7/8/8.1/10/Vista/XP.  In addition, this software works smoothly on any computer regardless of the computer brand. In other words, no matter you are using the Samsung laptop or Asus desktop, iSunshare System Genius performs the same to help users disable the automatically programs.  Let’s see how it works.

Step-1:Download and install the software on your computer if you do not have it before.
Step-2: Open the software and click “Startup” on the left menu.
Step-3:  Click the Disable start button for the startup app you want to disable.  That’s all. How easy it is!

prevent apps from auto startup with System Genius

Related Articles:
  1. 3 Ways to Stop Windows 10 Apps from Automatically Launching at Startup
  2. How to Optimize Windows 8 to Run Faster
  3. How to Optimize Windows 7 to Run Faster
  4. How to Fix Slow Startup on Windows 10 HP Laptop Issue


Solved--Acer Laptop Takes a Long Time to Start up

$
0
0

I need help!  My Acer laptop takes at least 10 minutes to load before it goes to the login screen. It is really annoying. Even I emptied the recycle bin; it still takes a long time to boot. I have no idea what to do to speed up computer startup. It would be grateful if someone could help me out. My Acer laptop is in Windows 10. Thanks?”

It is common to see such Acer laptop taking too long to start issues on Acer forum. Yes, the longer the computer you use, the slower the computer runs. But, you can still make your Acer laptop run as faster as before if you know the ways. Here we will analyze why the Acer computer takes time booting and its corresponding solutions.

solved--Acer laptop takes a long time to startup


Reasons for Acer Taking a Long time to Boot

Just as the issue describes in the beginning, the Acer computer stays on the Windows loading logo for a long time. In other words, the computer is in slow booting. We deep into the reasons and separate it into three sections:

Reason 1: Too many auto-startup programs running in Windows 10 boot time

Just as you are ready to run in a campaign, the more things you carry, the slower you will be, the more time will be needed. It is the same to the computer booting. The more startup programs you have, the longer it will take to launch the computer.  What’s the startup program? It is the utility that is started automatically while the computer boots. A program can be enabled as the startup programs in the installation process. But you can disable its auto-startup in Windows 10 with no difficulty.

Reason 2:  Your hard disk is fragmented

Fragmentation stores files in non-contiguous areas on the disk, so your storage space is not used efficiently, which reduces the performance of your hard drive.  And defragmentation is the process of removing fragmentation from your hard drive with the goal of increasing the speed of reading and writing files, thereby increasing the speed of your computer. Thus, you need to make a defragment for your Acer hard drive.

Reason 3: There could be a virus infection

It is easy for computer to infect viruses or malware.  When the Acer computer is super slow, it may be caused by malware running in the background, which consumes too much system resources.  You can use Windows defender to protect your Acer computer.

Solutions to Speed up Computer Startup on Acer Windows 10

1. Deactivate the Unnecessary  Startup Programs and Applications

Step-1:  Right-click the toolbar and then choose Task Manager. Click More details to get more options.

More details for Task Manager


Step-2:  Then you can hit the Startup tap and get all the programs that running in the background while your Acer computer boots. It is available for you to disable the unwanted applications by selecting it and right-click to choose Disable option.

deactivate unnecessary programs

Alternatively, you can manage the auto-startup programs with iSunshare System Genius, the Windows System Software. The advantage of using this third-party tool is that it offers other methods for you to have a faster and smoother Windows running environment, like cleaning up junk files, delete invalid registry entries and more.

Step 1: Install and start iSunshare System Genius. Select “Startup” on its left panel.

Step 2: You can view the startup items here. To deactivate the apps that are not necessary, you can directly click the Disable startbutton. As a result, when you boot the computer next time, it will not run in the background to drag the Windows boot.

disable startup programs in iSunshare System Genius


2. Optimize Your Acer Hard Drive with  Defragment

It is necessary to defragment and optimize the drive to speed up computer frequently. First of all, you can enter “defrag” in the Windows search bar and select “Defragment and Optimize Drives” from the result. Then, you can select the drive to optimize.  Finally, click the Analyze and minutes later; click the Optimize button to finish the defragment.

defragment hard drive


3. Use Windows Defender to Protect Your PC

Step 1: On your Acer Windows 10 computer, access Settings> Update & Security> Windows Defender.

Step 2: Scroll down and click on Use Windows Defender option.

Step 3: Click on Scan now button to scan the PC and find whether there are viruses or malware attacking your PC.  And you will get the scan result soon.

scan malware in Windows Defender


Bottom Lines

You can try one or more solutions here to fix Acer laptop taking long time booting issue. Also, you can delete all junk files from Windows 10 PCbefore you adopt these solutions.  I hope this can help you to boot Windows 10 faster in seconds.

Related Articles:
  1. How to Increase System Performance in Windows 10 HP Laptop
  2. How to Find and Delete Scan History of Windows 10 Defender
  3. Solved—Windows 10 Startup Very Slow After Update on Lenovo
  4. How to Prevent Programs from Opening on Windows Startup


How to Clean up HP Laptop to Run Faster

$
0
0

The HP laptop runs slowly? It is time to clean up your laptop and make it run faster. Now we share 3 options to clean up HP laptop for faster and better performance.

  • Option 1: Manually Delete the Temporary Files
  • Option 2: Use Disk Cleanup to Clean Computer Disk
  • Option 3: Clear HP Laptop with iSunshare System Genius
clean up HP laptop to run faster

Option 1: Manually Delete the Temporary Files

The temporary files can take up a large space and slow down the HP laptop performance. Every time you search online, it will generate a temporary file on your computer. Such files will lie in your computer forever if you do not delete it. So if your computer runs slowly, you can delete the temporary files manually.

Step 1: Find the files of your temporary files.

On Windows computer, you can find a great number of temporary files in this location: C:\Windows\Temp

Step 2: Hold down the Shift key and select the temporary files you want to delete. Or you can use Ctrl + A key to select all. After that, you can press the Delete key to clear the temp files.

delete temp files manually

Option 2: Use Disk Cleanup to Clean Computer Disk

Windows has the built-in utility Disk Cleanup which can help you to free up space when you get a slow using experience.  Disk Cleanup enables you to remove temporary files, empty recycle bins and other files that are useless for your computer.

Step 1: On your Windows computer search box, enter “disk cleanup” and select Disk Cleanup app/program.  After that, it will pop out a Window to calculate how much space you will be able to free.

Step 2: In Disk Cleanup interface, you are offered multiple options that you can choose to delete. You can tick those files that you no longer need or select all to delete.

Step 3: After you finish the selection, you can see the total amount of space you gain. After that, you can click the OK button to delete all the selected files.

disk cleanup to clean C drive on HP

Option 3: Clear HP Laptop with iSunshare System Genius

Although disk cleanup can help you clean the files that you do not need anymore, you will find it is difficult to delete specific files, such as IIS log files. Here we will teach you how to clear HP laptop with the third party tool—iSunshare System Genius to improve the computer performance.

Step 1: Download and install iSunshare System Genius on your computer. This software offers a 3-days free trial period.

Step 2: Open the software and make an overall scan of the HP laptop by clicking the Scan button.

scan HP laptop


Step 3: All junk files and invalid registry files are displayed in the scan result.  It is safe to delete all of them and will never cause any problem to the Windows computer. Thus, you can click the Clean button to perform the cleaning.

clean up computer with iSunshare System Genius

Minutes later, the cleaning will be finished. And you will find that there is much available space on your laptop now. As a result, the HP laptop will run faster than before. But you need to conduct the cleaning regularly if you want to keep the computer run as fast as it can.

Related Articles:
  1. How to Safely Remove Temporary File in Windows Computer
  2. How to Fix Slow Startup on Windows 10 HP Laptop Issue
  3. How to Speed up PC Performance in Windows 10
  4. How to Maintain a Good Performance of Windows Computer 


Forgot iPhone Passcode without Restore-How to Unlock It

$
0
0

It is terribly bad when you forgot iPhone passcode and cannot restore it via iTunes due to kinds of reasons, such as cannot get into iTunes with no verification code. Is it possible to unlock iPhone without passcode without restore? This article will share you two methods to unlock iPhone without restore.

forgot iPhone passcode without restore how to unlock it


Method 1: Use iCloud to Unlock iPhone without Restore

iCloud is the product developed by Apple, which aims to help users control the iPhone remotely. Find iPhone function from iCloud can help you detect where you iPhone is and erase all iPhone data which is linked to this Apple ID account. For those whose iPhone has enabled Find My iPhone, they can use iCloud on any accessible devices, including smartphones, Windows and Mac computer, to erase the forgotten passcode iPhone and use it again. The whole process is going to wipe all personal data in the iPhone, with no restore operation, and no iOS update.

Step 1: Navigate to icloud.com and sign in your account which is used in the locked iPhone.

Step 2: After you successfully get into icloud.com, you will see Find iPhone option in the main interface. Click it and view “All Devices” which has been connected to this iCloud account. You should click the device that your locked iPhone belongs to.

icloud Find iPhone


Step 3: Next, you will check the settings for your locked iPhone. Click the Erase iPhone and click all the positive answer for the coming box. Finally, all personal data in the locked iPhone will be erased. Of course, the iPhone will be restart and with no lock screen and passcode. You can activate it again for usage.

Erase iPhone


Method 2: Utilize iPhone Passcode Genius to Unlock iPhone without Restore

If you forgot iPhone passcode and enter several wrong passcode to make the iPhone disabled, in spite of the Find My iPhone is on or off, iPhone Passcode Genius would be one of the best ways to unlock the iPhone without restore. With the professional software, you can easily reset iPhone with a few clicks in minutes. Also, this software will update the iPhone to the newest compatible iOS version.

Step 1: Launch iPhone Passcode Genius and choose “Unlock Lock Screen”. If you do not have the software installed on your Windows computer, you need to download and complete the installed firstly.

click unlock lock screen


Step 2: Click Start. And connect the locked iPhone to the computer. When you make sure it is well connected, click Next to enter download firmware package interface.

click Start


Step 3: Here in this interface, the software has recognized your iPhone version. You just need to click the Download button and wait for few minutes.

download firmware package online


Step 4: Minutes later, the firmware package is downloaded and verified for your iPhone. Finally, you just need to click the Unlock button to remove the lock screen passcode. During the process, make sure the iPhone is connected to the computer. When it is done, your iPhone will be restart automatically to the Hello window. This means the unlocking process ends and you will also get notification from the software.

click Unlock to remove forgotten passcode


How to avoid data loss if you forgot iPhone passcode?

From the above two methods, you know that all the iPhone data will be deleted after the iPhone is unlocked without passcode and without restore. So how can you avoid data loss? It is better for you to backup iPhonedata via iTunes/iCloud or third-party tools regularly. If you have made the iPhone backup, even you unlock the iPhone with a password and lose the iPhone data, you can still make good use of the backup to find out what you want. Besides, as the technology developing, you will find a third-party software that is said to recover the data from the disabled iPhone.  Of course, it is necessary to create the backup from iPhone data as iPhone plays a more and more important role in our lives.

Related Articles:
  1. How to Unlock iPhone without iTunes or Passcode
  2. How to Unlock a Disabled iPhone without iTunes or iCloud or Computer
  3. How to Unlock iPhone If Forgot Passcode
  4. Solved - iTunes Could Not Restore iPhone Because Password Was Incorrect


How to Change/Remove/Reset Screen Time Passcode on iPhone if You Forgot it

$
0
0

A screen time restriction is set to limit your time spending on the app. If you forgot the screen time passcode, how can you change the restriction without data loss? Here we will deep into this issue with detailed steps.

change screen time passcode on iPhone if forgot passcode


Part 1: Change or reset the screen time passcode with Apple ID


This method is newly released by Apple. It is a pity that it can only apply to those who provide the Apple ID and password while setting up the screen time passcode.  Therefore, not all users can change/reset the screen time passcode although they upgrade to the newest 13.4 or above version.

Step 1: Make sure your iPhone is in iOS 13.4 or above version. You can check this by going to Settings > General > Software update.

check iPhone version


Step 2: Head to Settings > Screen Time > Change Screen Time Passcode > Change Screen Time Passcode.

change screen time passcode option


Step 3: Then you will be asked to enter the old screen time passcode. As you forgot the iPhone passcode, you can only tap the Forgot Passcode option under the Enter screen time passcode option.  At this moment, you will be prompted to entering the Apple ID and password for screen time passcode recovery. Tap OK after you complete to go ahead.

Step 4: If the Apple ID and passcode are 100% matching the one which you set before, you will get to the Change Passcode windows. Enter the new screen time passcode twice and the forgotten password is removed.

chnage screen time passcode


Part 2: Remove the screen time passcode on iOS 12 with iPhone Passcode Genius


If your iPhone is in iOS 12, here is another way to disable the screen time restriction—using iPhone Passcode Genius. iSunshare iPhone Passcode Genius is a professional tool that can help to remove the  forgotten screen time passcode on iOS 12 iPhone with no data loss. You just need a few clicks to make it done.

Step 1: Open iSunshare iPhone Passcode Genius and click Remove Screen Time Passcode.

select remove screen time passcode


Step 2: Connect the iPhone to the computer and make it unlocked by entering the screen passcode or Touch ID.

Step 3: After the software detects your iPhone, you will get the Start option. If you cannot get the unlock interface, you should check whether the iPhone is unlocked and repeat step 1.

remove screen time passcode

Step 4: Make sure the Find My iPhone is disabled. And you can click the Start button now to remove the screen time passcode. In minutes, you will get the passcode removed successfully. And you can set the new screen time passcode now.

remove screen time successfully


Part 3: How to change the screen time passcode of your child’s iPhone


If you take advantage of Family Sharing to manage your child’s account, you can reset the screen time passcode on your Child’s iPhone with the following steps.

Step 1:  Make sure your iPhone is updated to iOS 13.4 or above.

Step 2: On your iPhone, access Settings > Screen Time > Family > your child’s name.

Step 3: Tap Change Screen Time Passcode and tap Change Screen Time Passcode again. You would be required to verify with screen passcode or Face ID/ Touch ID. After that, you can set the new screen time passcode for your Child’s iPhone.


Part 4: How to Remove Screen Time Passcode if Forgot via Restore


If you find no way to reset the screen time/restriction passcode after forgetting it, you can take iTunes restoring into consideration. First of all, you should know that iTunes restore will erase all the iPhone data if you do not have a backup before the screen time forgetting. And all passwords will be deleted on the iPhone. Finally, you need the computer which you have synced iPhone in the past days.


After you connect the iPhone to the computer, you can launch iTunes and select your iPhone. Then you will see the Restore iPhone option and click it. In the prompt window, click Restore without hesitation.  Now you just wait for the process to end. After that, the screen time passcode is removed, as well as screen time is turned off/ disabled. 

restore iPhone in iTunes


Related Articles:
  1. How to Disable ScreenTime on iPhone without Passcode
  2. What to Do If I Forgot My Screen Time Password
  3. How to Unlock iPhone X without Passcode or Face ID
  4. How Do I Remove an Apple ID from My iPhone 


How to Speed Up Windows 10 Boot/Startup Time

$
0
0

Do you feel your Windows 10 boot or startup slowly? Are you finding effective ways to speed up Windows 10 boot time? You can get 4 effective ways in this article.
  • Way 1: Disable Auto Start Programs to Speed up Windows 10 Startup
  • Way 2: Free up System Space to Speed up Boot Time
  • Way 3: Enable Fast Startup to Increase Boot Speed
  • Way 4: Shorten the Boot Menu Timeout to Improve Boot Time
how to speed up Windows 10 boot time


Way 1: Disable Auto Start Programs to Speed up Windows 10 Startup

When it comes to the slow boot up issue on Windows 10, you should go to check how many programs to start up with the Windows system. If there are too many programs booting at the same time, the boot time will be definitely longer. Thus, you can disable some unnecessary startup apps to speed up Windows 10 startup.

Step 1: Open Task Manager and then click the Startup tab.

Step 2: Then you can select the program or app that you think is unnecessary to enable in the list of automatically starting programs. In the end, click the Disable button on the bottom right corner.

disable auto startup programs in Task Manger


Way 2: Free up System Space to Speed up Boot-Time


When your Windows 10 computer is almost full, the Windows boot time will be postponed. In this situation, you can go to free up system space to speed up boot time. Most people said the boot time is improved obviously after they do cleaning for the Windows PC.

Here you can use iSunshare System Genius to free up disk space with simple steps. It can also help you clean up junk files and invalid registry entries to improve computer performance.

Step 1: Download and install iSunshare System Genius. It is free to download and have 3-day for a free trial of all functions.

install iSunshare System Genius

Step 2: Select System Disk option on the left menu. After that, it will tell you how much space you can get after the cleaning. With a simple click on the Release button, you will remove all the junk files on the system disk.

free up system disk space


Step 3: If you think there can be more space to release, you can go to click the Clean All option on the left menu.  Next, click the Scan button on the center to analyze the useless files that can be deleted from your computer.

scan all junk files in Windows 10


Step 4: Minutes later, you can get the result and click the Clean button to remove all those files from your Windows 10 computer.

click Clean


The cleaning ends and you can close the software and reboot the computer. Believe it or not, with the space released, your boot time can be improved greatly.


Way 3: Enable Fast Startup to Increase Boot Speed

The Fast Startup function enables you to start the PC faster after the shutdown. It is recommended to turn it on.

Step 1: Open Control Panel and select Power Options.

Step 2: On the Power Option interface, click Choose what the power buttons do on its left panel.

click Choose what the power buttons do

Step 3: After that, you can choose the power settings that you want for your computer. Just go to click Change Settings that are currently unavailable.

click Change settings that are currently unavailable

Step 4: Then, you can check the box next to Turn on fast startup option. In the end, click Save the changes button to apply your setting.

turn on Fast Startup


Way 4: Shorten the Boot Menu Timeout to Improve Boot-Time

You can change the system startup settings to reduce the boot time. Firstly, access Control Panel> System> Advanced system settings. Then you need to hit Settings under the Startup and Recovery section. After that, you can adjust the time to display list of operating systems. Finally, click OK to save the changes.

shorten the boot menu timeout

Related Articles: 
  1. How to Prevent Programs from Opening on Windows Startup
  2. Solved--Acer Laptop Takes a Long Time to Start up
  3. How to Clean up HP Laptop to Run Faster
  4. How to Disable Windows 10 Unnecessary Services to Improve Performance
  5. How to Speed Up A Slow Acer Aspire Laptop 


How to Copy the Internal Hard Drive to an External Hard Drive in Windows

$
0
0

I suffered a data loss due to the hard drive failure one year ago. And now I want to copy my internal hard drive to an external hard drive in Windows OS. How do I transfer everything from my computer to an external hard drive? Is it possible to clone the hard drive successfully?”

Many Windows users get used to create a backup of the data in case of data loss for a variety of reasons. But if you back up the PC to the external hard drive, it is inconvenient to access the data as you need to restore it. Thus, it is a good idea to clone a whole internal hard drive to external hard drive, which enables you to check the data at any time with any computer.

copy internal hard drive to an external hard drive


To clone a hard drive to external drive, you need the professional Windows hard drive cloning software. iSunshare CloneGo is highly recommended here, which can help you to clone hard drive to another hard drive within several simple clicks.  After the cloning, you can get an identical partition layout.

How to Copy the Internal Hard Drive in Windows

First of all, you need to get iSunshare CloneGo on your Windows computer. You can free download and install it within minutes. For the new users, it offers a free trial of all functions.

Step 1: Connect the external hard drive with the computer. If there are any other data stored in the external hard drive, you should create a backup of it. Or you need to get a new external hard drive as the hard drive clone will wipe all the data on the external hard drive.

Step 2: Launch iSunshare CloneGo and tick Disk Clone option on the left menu.
On this interface, you can know how many disks are connected to the computer and how many volumes are detected by the software. Each volume is marked with the total space and available space.

select disk clone


Step 3: Select the source disk—the internal hard drive, and the target disk—the external hard drive. Also, if the computer is stored with a large number of data, you can check the After Finish box and choose Shutdown/Restart/ Hibernate.

choose source disk and target disk


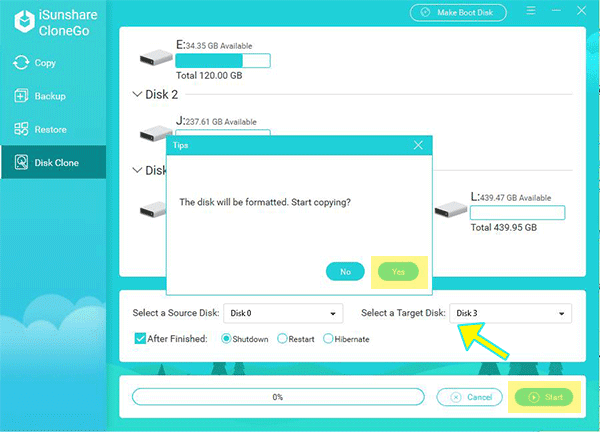
Step 4: Click the Start button and you will know that this operation will format the data on the external hard drive. If you want to go ahead, click the Yes button and the data will be cloned to the external hard drive instantly.

click Start and format the target disk


After the cloning, you will get the identical partitions on the external hard drive. If you want to test whether the OS configurations, settings, and data can be bootable or not, you can try to boot the computer from the external hard drive.

Tips:
  1. If you want to resize the external hard drive after cloning process ends, you can open Disk Management and then extend or shrink the volume. Also, you can add new simple volume from the unallocated space.
  2. It is better to clone the disk with the same partition styles, such as Clone GPT disk to GPT disk.
  3. The external hard drive should be larger than the internal hard drive; otherwise, it is impossible to clone the disk.
  4. You can also use the Disk Clone feature to clone an HDD to an external SSD for computer upgrade.

Related Articles:
  1.  How to Clone External Hard Drive to Another in Windows
  2.  How to Clone MBR Disk to GPT Disk in Windows 10
  3.  2 Ways to Clone SSD to Samsung SSD in Windows 10
  4.  How to Transfer Files from One Computer to Another Computer in Windows
  5.  How to Replace HP Laptop Hard Drive with SSD without Reinstalling Windows 


How to Clone USB to Another USB in Windows 10/8/7

$
0
0

“I have an old SanDisk 4G USB flash drive which stores all memories of my school life. Now I want to clone them to a larger Kingston 64GB USB flash drive as I’m afraid that the old USB would not work in the future. Is there any way to finish the USB data migration? Thanks!”

There is no doubt that it is convenient to store the data in USB flash drive or USB hard disk. You can carry it to anywhere, for business, for presentation, for a speech and etc. And in order to avoid the data loss, you need to make a backup of the files in the USB drive. No matter you want to clone the USB data to the larger USB drive, to USB portable hard disk, or SSD, you can get two ways to clone the USB to another USB in Windows 10/8/7.

clone USB to USB in Windows


Way 1: Clone the USB with Copy-and-paste Operation

The copy and paste operation is the most common way when you want to transfer the USB data. For the entire USB data, you can also copy the data and then paste on another USB. First of all, you need to make the two USB drive connected to the Windows computer.

Option 1: Open Computer (In Windows 10, click This PC), and you can find all devices connected to the computer. Right-click the USB device you want to clone and then choose the Copy option. Afterward, you can right-click the target USB device and select the Paste option. Finally, the files in the source USB will be copied to another USB.

copy USB to another USB


Option 2: Access the source USB drive and press Ctrl + A to choose all folders and files. Then press Ctrl +C to copy all selected data. In no time, you can access another larger USB drive and then press Ctrl + V to paste all copied data to the target USB. In the end, you just need to wait for the data migration ends.

copying USB files to another USB


Way 2: Clone USB Drive in Windows Using iSunshare CloneGo

iSunshare CloneGo is the effective disk cloning software that you can make good use to clone the USB data. It is safe to clone USB data to a larger USB without data loss by using this software. You are offered the free trial version.

How to Copy USB to USB in iSunshare CloneGo: 

You can utilize the Copy feature of iSunshare CloneGo to duplicate the USB data to another USB flash drive. But you will lose the data in the target USB as it will help you to format it.

Step 1: Launch the program and select Copy. At the same time, you can view all volumes detected by the software.

Step 2: Select the USB you want to copy as the source partition and another USB as the target partition.

copy USB to another USB using iSunshare CloneGo


Step 3: After that, you can click the Start button and confirm the format operation. The program will start the data cloning immediately.

start USB copying

Related Articles:

  1. How to Access USB Flash Drive with BitLocker Password Protection on macOS 
  2. How to Copy Windows OS to WD Elements SE USB Portable Hard Disk
  3. How to Password Protect a USB Flash Drive with BitLocker on Windows 10 
  4. Fixed—USB Devices Not Recognized on Windows 10
  5. Free 2 Ways to Password Encrypt a USB Flash Drive on Mac 


How to Clone HDD to Samsung 860 EVO SSD in Windows 10

$
0
0

Samsung 860 EVO SSD is tested to have the best performance in an SSDs review. If you want to speed up Windows 10 performance, it is a great idea to clone hard drive to Samsung 860 EVO SSD. There are two tools introduced here for you to clone HDD to Samsung SSD in Windows 10: Samsung Data Migration and iSunshare CloneGo.
  • Preparation: Make the Samsung 860 EVO SSD be recognized
  • Part 1: Clone HDD to Samsung 860 EVO using Samsung Data Migration
  • Part 2: Clone HDD to Samsung 860 EVO using iSunshare CloneGo

clone HDD to Samsung 860 EVO SSD


Preparation: Make the Samsung 860 EVO SSD be recognized


It is better for you to connect the Samsung SSD with the computer. Or you can directly install the SSD into the computer if there is an available slot. Besides, you should make the SSD recognized by your Windows 10: Right-click This PC and choose Manage to enter the Disk Management; then a box will pop out to ask for the SSD initialization.


Part 1: Clone HDD to Samsung 860 EVO using Samsung Data Migration


 Yes, Samsung develops its own migration tool—Samsung Data Migration Software (SDM) which enables users to migrate data quickly and safely from the existing storage device to a new Samsung SSD. It can apply to any Samsung SSD product, including 470 Series, 830 Series, 840 Series, 840 PRO & EVO Series, 850 PRO & EVO Series, 860 QVO/PRO/EVO Series, 950 PRO Series, 960 PRO & EVO Series, and 970 EVO/EVO Plus/PRO Series.

You can download this software from Samsung official websiteto clone the current operating system, application software, and user data to the Samsung SSD.

Step 1: Start Samsung Data Migration and choose Target Drive.

Once you start Samsung Data Migration, it will detect your current Windows OS drive as the source drive. What you need to do is select the Samsung SSD as the Target Drive.

select target drive


Step 2: Select the volume you want to clone from the source drive.

It is available for you to select up to three volumes including the C partition to clone.

select volumes to clone


Step 3: Click the Start button to begin the cloning process.

click the Start button


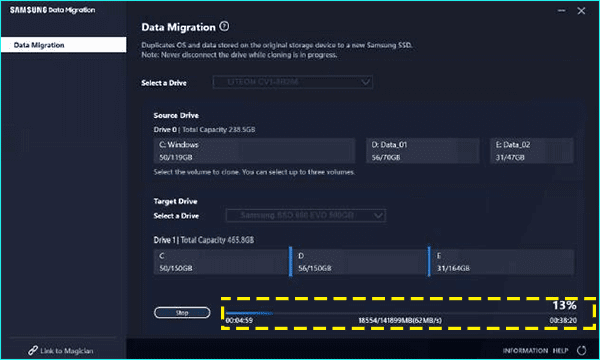
Step 4: The data is copying from the source drive to Samsung SSD.

Due to the different computer specifications and operating environment, the cloning speed varies. Thus, it is unable to predict how much time it will cost to clone the data. Additionally, when the cloning process ends, your computer will shut down automatically. As a result, it is no need for you to wait for the ending of cloning.

cloning process in Data Migration


Notices:
  • The software cannot clone a hard drive without an operating system in. So, the source drive must be your system drive.
  • The number of volumes in Source Drive chosen to clone should be no more than three.
  • It may not clone the dynamic disk to Samsung SSD. 

Part 2: Clone HDD to Samsung 860 EVO using iSunshare CloneGo


No matter you are going to clone the HDD with the operating system or just all the data to Samsung SSD, no matter how many volumes in the source disk, iSunshare CloneGocan help to migrate everything from the original hard drive to your Samsung 860 EVO SSD. Of course, your SSD should be with enough capacity. As an alternative to Samsung Data Migration Software, iSunshare CloneGo can work as the hard drive cloning software to upgrade your computer quickly and safely.

Step 1: Get iSunshare CloneGo on your Windows 10 computer.

You can free download the software from iSunshare official website. There are three days for you to free test the software. It takes a few minutes to download and install the software.

Step 2: Launch iSunshare CloneGo and set the source & target disk.

You can run the software after it finished the installation. After that, the main interface with four main functions is displayed. You need to select the Disk Clone function. Next, you can scroll down to view all disks & volumes. Afterward, select your Windows 10 computer original hard drive as the source disk and Samsung 860 EVO SSD as the target disk.

set source and target disk


Step 3: Set the After Finished operation

Everyone knows that there are a larger number of data in the hard drive. As a result, the cloning process would take longer than you’re expected. For those users who are very busy and have several computers, they can set the After Finished settings. For example, if you want to the Windows 10 computer to automatically shut down after successful cloning, you can check After Finished box and select the Shutdown option.

set After Finished operation


Step 4: Click the Start button

When everything is ready, you can hit the Start button. A small box will pop out, which tells you that the cloning will format the target disk. Hit Yes to continue.

start disk cloning to Samsung SSD


Step 5: The clone in process

The cloning process will start automatically. It is no need for you to walk through the whole process. Just do other job with another computer or have a meeting with others. The computer will do what you set after the process ends.


Related Articles:

  1. How to Clone Dynamic Disk to SSD in Windows 10  
  2. How to Clone M.2 SATA SSD to M.2 NVMe SSD in Windows Computer
  3. How to Copy Internal Hard Drive to External Hard Drive in Windows
  4. How to Transfer Files from One Computer to Another Computer in Windows
  5. How to Clone MBR Disk to GPT Disk in Windows 10 


Viewing all 125 articles
Browse latest View live