Quantcast
Channel: Password Recovery Ways|Tips
Viewing all 125 articles
Browse latest View live

How to Recover Damaged or Corrupted Word Document

$
0
0

 When you open a Word document and find that the layout and formatting are in a mess so that it is impossible to read normally, the Word file might be corrupted or damaged. Or when you cannot open the Word file and get the error messages, the file is recognized as a damaged document. There are other abnormal behaviors that can help you to identify the damaged Word file, such as some characters are unreadable, and digital gibberish appears on the document. Now that we know that how to identify a Word file is normal or damaged/corrupted, how can we solve this issue and recover damaged or corrupted Word document? You need a professional Word repair tool.

recover damaged word document

About iSunshare Word Repair Genius

When it comes to the Word repair tool, iSunshare Word Repair Genius is highly recommended. This excellent Word repair tool can help you to repair and recover the Microsoft Word files in DOCX format without any changes to the original structure and content of the document. Besides, you are able to save the restored Word document as another new file and full control of the content. iSunshare Word Repair Genius is compatible with Microsoft Word 2007/2010/2013/2016/2019.

It is secure to recover the damaged or corrupted Word file with iSunshare Word Repair Genius. You can find that everything is identical to the original one, including the text, fonts, images, hyperlinks, and so on.

How to Repair the Damaged or Corrupted Word Document

First of all, you need to make sure Microsoft Word is not in use.

Step 1: Download and install iSunshare Word Repair Genius on your Windows computer.

install iSunshare Word Repair Genius

Step 2: Run the software and hit the Open button to add your damaged or corrupted Word file to the path box.

add the damaged word file

Step 3: Immediately, the file is restored. Click the OK button to continue.

word file is restored

Step 4: Click the Save button and decide the location to store the restored Word file.

save the restored Word file

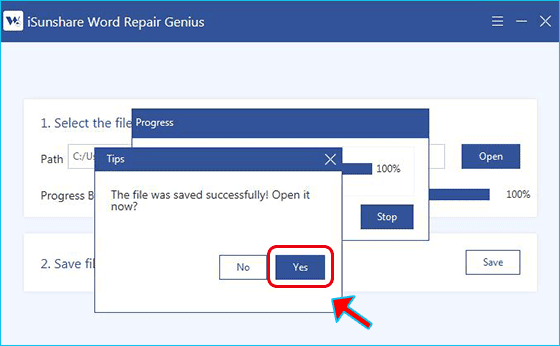
Step 5: The file is saved successfully. You can open it to digest the content.

open the saved Word file

Related Articles:

  1. Fixed--Microsoft Word File Corrupted and Unreadable
  2. Fixed--the file cannot be opened because there are problems with the content
  3. How to Recover Text from a Damaged/Corrupted Word Document


How to Repair an Excel File That Will Not Open

$
0
0

 When you get such error messages, including “Excel found an unreadable content in ‘<filename>’ Do you want to recover the contents of this workbook? If you trust the source of this workbook, click Yes”, “Can’t find project or Library”, “This workbook cannot be opened or repaired by Microsoft Excel because it is corrupted” and “Microsoft Excel has stopped working”, the Excel file is corrupted and cannot be opened. How can you repair the corrupted Excel file? Don’t worry; here are three effective ways for you.

  • Way 1: Open and Repair an Excel File with MS Office Built-in Function
  • Way 2: Change the Calculation Option to Manual
  • Way 3:Use Professional Excel Repair Software
how to repair excel file that will not open

Way 1: Open and Repair an Excel File with MS Excel Built-in Function

 When you get the notification like “Excel found an unreadable content in ‘<filename>’ Do you want to recover the contents of this workbook? If you trust the source of this workbook, click Yes”, MS Excel automatically launches File Recover mode and try to repair the workbook for you. Of course, you can also manually start the Open and Repair utility to repair the Excel file that cannot be opened.

Step 1: Open MS Excel or directly open a blank workbook. Then hit File > Open.

Step 2: Go to the location where the corrupted Excel file stores and then choose it in the Open window.

Step 3: Click the icon behind the Open button, and then you can choose the Open and Repair option.

choose Open and Repair option


Step 4: In the pop-out window, click the Repair button. If it makes no effect, you can try the second option Extract Data.

click Repair

Way 2: Change the Calculation Option to Manual

You can change the calculation option to manual to recover data from the Excel file that will not open.

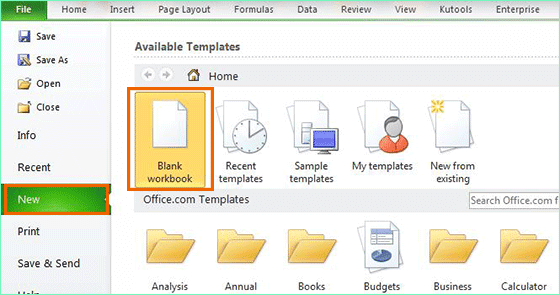
Step 1: Launch the MS Excel and access File > New > Blank Workbook.

open new blank workbook

Step 2:  In the new workbook, click File > Options.

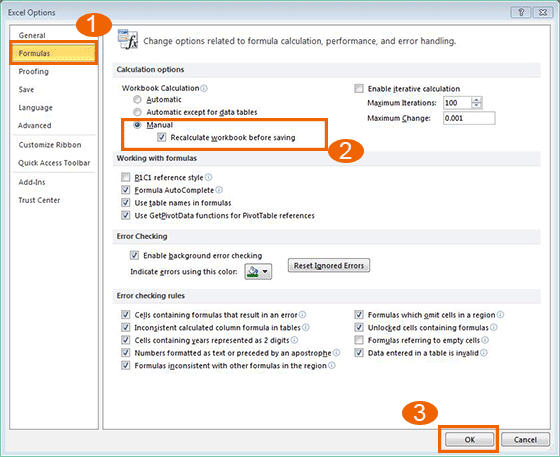
Step 3: In Excel Options window, select Formulas from the left panel and then set the Workbook Calculation option to Manual.  After that, click the OK button to apply the change.

change calculation option to manual

Step 4: Now, you can click File > Open to open the corrupted Excel file.

Way 3: Use Professional Excel Repair Software

 If the above methods cannot help to repair your Excel XLSL file, you can use the professional Excel repair software to repair and restore the corrupted XLSL content. iSunshare Excel Repair Geniusis the professional and easy-to-use Excel repair tool that helps to repair the XLSL file without changing its original layout and structures.

Step 1: Download and start the program immediately after finishing the installation.

Step 2: Open the corrupted Excel file and click the Restore button.

restore the corrupted Excel file


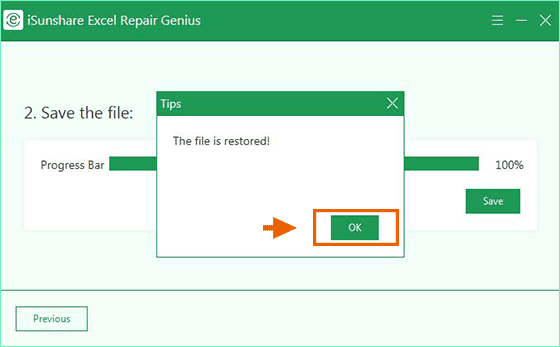
Step 3: Once the restore completes, you can see there is a Tips box to inform you. Hit OK to go ahead.

the file is restored prompt


Step 4: Click the Save button and find a location to save the new Excel file with the restored data.

save the restored Excel file


Step 5: The file is saved successfully in seconds. You can open the file by clicking the Yes button.

save restored file successfully

How to Encrypt A USB Flash Drive in Windows 10 – Make It Safer

$
0
0

For more security and privacy, it is highly advisable to encrypt a USB flash drive to prevent any unpredictable and unauthorized access. In this article, we will share with you several easy and effective methods to encrypt a USB flash drive in Windows 10.

how to encrypt usb flash drive in windows 10

Way 1: Encrypt USB flash drive with BitLocker

If you want to encrypt USB flash drive, BitLocker Drive Encryption is your first choice. As a Windows built-in encryption tool, BitLocker Drive Encryption can securely encrypt your data on USB flash drive with industry-standard AES encryption, which is very trustworthy. iSunshare BitLocker Genius for Windows is an assistant tool that can help you encrypt USB flash drive with BitLocker more conveniently and intuitively. The following guide is about how to use this tool to encrypt USB flash drive with BitLocker in ease.

Step 1: Download and install this tool on your computer and insert a pen drive into your computer.

Step 2: Launch this tool. On the interface, right-click the USB drive and select Turn on BitLocker option.

turn on bitlocker

Step 3: Type and confirm a password and then click save to file button to back up a .txt file as recovery key.

save a recovery key

Step 4: Then choose a location to save the new recovery key file and click Save button.

choose where to save recovery key

Step 5: Click Encrypt button to start encrypting. Wait for a while until a window pops up prompting that the encryption is competed.

start encrypting

Step 6: Right-click the hard drive and select Lock Drive option. Finally, the pen drive is encrypted with BitLocker Drive Encryption.

lock drive

Tips: This tool also allows you to change the password and remove BitLocker from USB flash drive. In addition, you can also lock or unlock BitLocker conveniently.

Way 2: Encrypt USB flash drive with DiskCryptor

DiskCryptor has been discontinued since 2014, but it’s still a good solution to encrypt USB flash drive. Its handiness and high speed of encryption are the reasons for recommending it. Follow the steps below to use DiskCryptor to encrypt the USB flash drive.

Step 1: Download and install it on your pc and insert USB flash drive into your pc.

Step 2: Launch it. Right-click the pen drive and select Encrypt option.

encrypt a usb flash drive

Step 3: On a popup window, choose an algorithm and wipe mode and then click Next button.

choose an algorithm

Step 4: Type and confirm a password and click OKbutton to start encrypting.

enter password

Step 5: Wait for a minute until the encryption process is finished.

wait-for encrypting

Way 3: Encrypt USB flash drive with VeraCrypt

VeraCrypt is a fork of TrueCrypt and is widely acknowledged its successor. It is also one of the most popular and secure disk encryption tools. Here is how to encrypt USB flash drive with VeraCrypt.

Step 1: Download and install this tool on your Windows computer. Then insert your USB drive into your pc

Step 2: Launch it and then click Create Volume button.

create volume

Step 3: Select Encrypt a non-system partition/driveoption and then click Next button.

encrypt a non-system partition

Step 4: Select Standard VeraCrypt volume option and then click on Next button.

standard veracrypt volume

Step 5: Click Select Device button. On a new window, select the USB flash drive and click OK button. Then click Next button.

select device

Step 6: Choose a volume creation mode and click on Next button. If you have data stored on USB drive, choose Encrypt partition in place option. Otherwise, choose the other one.

choose a volume creation mode


Step 7: Choose an encryption and hash algorithm for the encryption and click Next. If you have no idea, it would better to leave the default settings.

choose an encryption and hash algorithm

Step 8: Type and confirm a password and click on Next button.

type password

Step 9: Finally, wait for a while until the interface prompts that the USB drive has been encrypted successfully.

encrypting


Relative Articles:


5 Easy Ways to Recover a Corrupted PowerPoint PPTX File

$
0
0


When you are going to open the PowerPoint presentation and make a preparation for a business, there is a message pop out that tells you the pptx.file cannot be opened because there is some error in the content or it is corrupted, how can you do to recover the corrupted PowerPoint file? You can take the following 5 methods as a reference to open the corrupted PPTX file.

  •  Way 1: Change the Location of Your PPTX Presentation 
  •  Way 2: Add Corrupted Slides into a New PowerPoint File 
  •  Way 3: Try to Open the PPTX File in Safe Mode 
  •  Way 4: Open and Repair the Corrupted PPTX 
  •  Way 5: Recover the Corrupted PowerPoint File with PowerPoint Repair Genius


recover corrupted PPTX file

Way 1: Change the Location of Your PPTX Presentation

 Why we need to change the location of your PowerPoint presentation that cannot be opened? As we know, when there is an error in the hard disk, you will probably get into the trouble of opening the files in it. So, taking this into consideration, you can move the PPTX file to another location, such as from hard disk 1 to hard disk 2, from internal disk to external disk, and from removable drive to internal hard disk.

How to change the location of the corrupted PPTX file? So easy! Just go to where your PowerPoint presentation lies and then copy the presentation. After that, navigate to the destination location and then paste the presentation. Finally, open the PPTX file again and check whether the error gets solved or not. If not, keep on reading next solution.

Way 2: Add Corrupted Slides into a New PowerPoint File

Step 1: Launch the Microsoft PowerPoint program and then you will enter a new and blank PPTX file. Click the Home button and then click the arrow of the New Slide option. After that, choose Reuse Slides from the drop-down menu.

choose Reuse Slides

Step 2: Click the Browse button and then choose Browse File.  Then choose your corrupted PPTX file and click the Open button.

click Browse Files


Step 3: If it successfully recovers your slides, right-click any slide and select the Insert All Slides option. 

click Insert all slides


If it pops out the following window, it means that it fails to recover your content. You need to try other solutions.

could not open the file

Way 3: Try to Open the PPTX File in Safe Mode

 The corruption of your PPTX file might result from the add-ins.  You can try to open the corrupted PowerPoint PPTX file in safe mode to get this issue solved.

Step 1: Press Win + R key on your keyboard and you will see the Run dialog box. Then enter powerpnt.exe /safe and press Enter key. After that, you will start MS PowerPoint in safe mode.

open PPTX in safe mode

Step 2: Click File > Open and then select the corrupted PPTX file to open.

click Open

Step 3: If you make it open successfully, the reason for your PPTX file corruption is clear. You need to reinstall Microsoft PowerPoint to prevent this from happening again. If you fail to open the file and still get the error message, you can go ahead to read another solution.

Way 4: Open and Repair the Corrupted PPTX

Microsoft PowerPoint has the built-in repair tool that helps users to open and repair the corrupted presentation. You can have a try.

First of all, you can open MS PowerPoint program and then click the File > Open. Then navigate to the corrupted PPTX file and select it. Finally, click the arrow behind Open button and choose Open and Repair from the menu.  After that, you can just wait for the result.


select Open and Repair


Way 5: Recover the Corrupted PowerPoint File with PowerPoint Repair Genius

If you try all ways above and none of them can help, you can use the professional PowerPoint repair tool—iSunshare PowerPoint Repair Geniusto repair the corrupted PPTX file.  This software can help you to open and repair the corrupted or damaged PPTX file in minutes which will not change your presentation structure and formatting.

Step 1: Download and install iSunshare PowerPoint Repair Genius on your computer.


install iSunshare PowerPoint Repair Genius

Step 2: Close the MS PowerPoint program and then run iSunshare PowerPoint Repair Genius. After that, click the Open button to add your PPTX file. When it is added, click the Recover button.


recover corrupted pptx file

Step 3: In no time, the software will start repairing your PowerPoint presentation.


pptx file is repairing

Step 4: When the repairing ends, you will get the notification. Click the OK button and then click the Save button to save the repaired PPTX file into your local computer. You can decide where to save the repaired file.


save the restored PPTX file

Step 5: In the end, you can select to open and view the repaired content when it is saved successfully.

save successfully

Related Articles:

  1. Solved-- Cannot Open PPTX File in PowerPoint 2010/2013/2016
  2. Fixed: PowerPoint Found a Problem with Content
  3. How to Fix a Corrupted MS PowerPoint Presentation


5 Effective Solutions to Fix iPhone White Screen of Death

$
0
0


“When I tried to update my iPhone 11 from iOS 13 to iOS 14, there was something wrong with my iPhone.I set it aside during the upgrade, and when I took my iPhone again, I found it was stuck on white screen of death. I didn't know what happened. I had tried lots of methods to rescue it but none of them worked. What should I do?”

iPhone white screen of death is a very common and vexed system problem of iOS devices and there are various kinds of reasons for this problem. In this post, you can learn about the cause of iPhone white screen of death and five effective solutions to fix this problem. Even if you are a noob, you can also repair your iPhone with your own hands like a technician after reading this post.

  • Some common causes of iPhone White Screen of Death
  • Solution 1: Hard reset your iPhone
  • Solution 2: Check if Screen Magnification is on
  • Solution 3: The best way to fix iPhone white screen of death without data loss
  • Solution 4: Restore iPhone with Recovery or DFU Mode by iTunes
  • Solution 5: Contact Apple Support

fix iphone white screen of death

Some common causes of iPhone White Screen of Death

1. iOS update failed

This is the main reason for Apple's white screen. Although updating iOS can fix some bugs, the existence of certain conflicts may cause the system fail to update and white screen of death.

2. Software upgrade failed

Sometimes the issue of white screen of death occurs after software upgrade. Some major software may be incompatible with the system after updating.

3. Jailbreak issue

Jailbreak refers to privilege escalation on an Apple device to remove software restrictions. However, if you use some unreliable tool to jailbreak your iPhone, it may fail to jailbreak and damage iOS resulting in iPhone white screen of death.

4. Hardware problem

If iPhone white screen of death appears after it is physically or water damaged, it is likely that one of iPhone components has been broken. So, the iPhone cannot work normally.

7 Effective Solutions to Fix iPhone White Screen of Death

Solution 1: Hard reset your iPhone

When your device encounters a problem, the first choice for most people is to restart it. However, a general restart will not work in most cases. So, you can try a hard restart to fix the issue of iPhone white screen of death. Here’s how to hard reset iPhone of different versions.

iPhone 6 and below

1.      Hold down the Power and Home buttons at the same time.

2.      Keep holding both buttons until the screen turns black and you see the Apple logo.

3.      When the phone goes off, wait for 30 seconds before powering it back on.

iPhone 7

1.      Hold down the Power and Volume Down buttons at the same time.

2.      Keep holding both buttons until the screen turns black and you see the Apple logo.

3.      When the phone goes off, wait for 30 seconds before powering it back on.

iPhone 8 and above

1.      Hold down the Volume Up button, then release it.

2.      Hold down the Volume Down button, then release it.

3.      Press the Power button until the Apple logo appears before releasing it.

Solution 2: Check if Screen Magnification is on

Sometimes, there is a chance that you may turn on Screen Magnification function by accident. In this case, you may be zoomed super close in on something white which makes it look like a white screen. Hence, to fix it, you can follow the steps below.

Steps: Go to Settings> General> Accessibility> Zoom> Off.

screen magnification


Solution 3: The best way to fix iPhone white screen of death without data loss

The best way to fix iPhone white screen of death is to use a powerful tool named iSunshare iOS Repair Genius. It is a powerful and easy-to-use ios repair tool that enables you to fix most of common system issues like white screen of death without any data loss. Here’s a full guide on how to use iOS Repair Genius to fix the problem of white screen of death.

Step 1: Download and install this app on your computer. Open this app and connect your iPhone to computer.

Step 2: Select Standard Mode to fix your iPhone without data loss.

select standard mode

Step 3: Click Start button to continue.

start

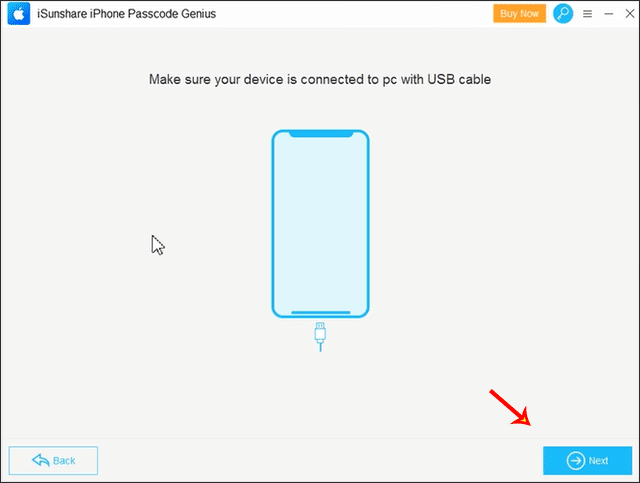
Step 4: Make sure that your iPhone is connected to your pc and click Next button to continue.

click next

Notes: If the app can’t detect your iPhone, you need to put it in DFU Mode or Recovery Mode. Just follow the guide on the interface.

Step 5: Click Download button to download a firmware package. You can click Select button to choose the location to store firmware package.

download firmware

Notes: On the bottom of interface, you can also click Copy button to download it in a browser and then click Select button to import it to app.

download firmware in browser

Step 6: Wait for the application to verify the firmware, then click Repair button to start repairing.

repairing

Step 7: It may take some time to wait. Once the process of repair is done, the app will prompt you that the device has been repaired successfully. Click OK to close the window.

repair successfully

Finally, the issue of white screen of death has been solved and your iPhone can work normally again. If not, you can try to fix it with the other repair mode of this app (Advanced Mode). But it will factory reset your iPhone and all the data will be erased.

Solution 4: Restore iPhone with Recovery or DFU Mode by iTunes

When your iPhone is stuck on white screen of death, you can restore it to get it back to normal. However, all the data will be erased. If you don’t care about the data, follow the steps below to fix your device.

Step 1: Open iTunes and connect your iPhone to computer via USB cable.

Step 2: Put your iPhone into Recovery Mode or DFU Mode. You can try the Recovery Mode first and then the DFU Mode. 

Step 3: If you put your device into DFU Mode, you will be asked to restore your iPhone, click OK button to continue.

restore iphone with dfu mode

 Step 4: If you choose to put your device into Recovery Mode, there will be two buttons on the pop-up window, select Restore button and then wait for a while util the whole process finishes.

restore iphone with recovery mode

Step 5: Finally, when iTunes finishes restoring, your iPhone will restart automatically, your iPhone comes back to normal.

Solution 5: Contact Apple Support

If all the ways mentioned above are not workable, it's probably a hardware problem that causes iPhone white screen of death. In this case, you need to contact Apple Support for help. They can offer the best support options to help you solve all kinds of hardware issues.
 

How to Fix iPhone Grey Screen

$
0
0

 My iPhone 7 screen suddenly goes gray. No matter what I do, it does not make responding. How can  I do to get iPhone 7 out of grey screen?”

The iPhone grey screen can lead to the death of an iPhone so it is also called the iPhone grey screen of death. When your iPhone screen turns gray, what you can do to get out of the grey mode? Read this article and you can get the answer.

how to fix iPhone grey screen

Way 1: Force Restart iPhone

When the iPhone fails to turn on and displays a grey screen, the first action you should do is to force restart the iPhone to check whether it works or not:

For the iPhone 8 and above users, you can press and quickly release the volume up button and then do the same to the volume down button. After that, press and hold the side button until you see the Apple logo.

If you are using iPhone 7, you can press and hold both the volume down button and the Sleep/Wake button at the same time until you see the Apple logo. After that, release the buttons.

For iPhone 6 and earlier iPhones, you can press and hold the Sleep/Wake button and Home button until the Apple logo appears.

force restart iPhone

Way 2: Try to restore iPhone in iTunes

When your iPhone screen is gray, you can take iTunes into considering solving the issue. It should be notice that all information and settings on iTunes will be deleted if you choose to restore the iPhone in iTunes with the following procedure:

Step 1: Launch iTunes on your computer and then connect the iPhone with grey screen to the computer.

Step 2: After iTunes detects the iPhone, you can click the icon near the top left of the iTunes to enter your iPhone interface. After that, click Summary on the left panel.

Step 3: On the right panel, click Restore iPhone and then it will pop out a box that asks for your confirmation again. Click Restore to continue.

Step 4: Then, you just need to wait for iTunes to download the software firmware for your iPhone and then restore it to factory settings so that the iPhone grey screen can be fixed.


restore iPhone in iTunes

Way 3: Fix iPhone Grey Screen with iSunshare iOS Repair Genius

If your iPhone is stuck on the grey screen and you cannot turn it on by all possible means, there could be an error in the iOS system. You can use iOS system recovery software, such as iSunshare iOS Repair Genius, to fix the iPhone grey screen and then get iPhone back to normal.

Step 1: Download and install iSunshare iOS Repair Genius on your Windows computer. To enjoy the full functionality of this software, you need to purchase the full version.

Step 2: Launch the software and then choose the Standard Mode.

choose the Standard Mode

Step 3: Next, click the Start button and then connect the iPhone to your computer.

click the Start button

Step 4: After that, click the Next button.

click the Next button

Step 5: Check your iPhone iOS version and the model version in this interface and then click the Download button to get the firmware package for the iPhone. After downloading, the software will start o verify the firmware.

download the firmware package

Step 6: When the firmware has been verified successfully, you will go to the repair window. By clicking the Repair button, iSunshare iOS Repair Genius will automatically fix your iPhone and you should make the iPhone connected during this process.

click the Repair button

In the end, your iPhone will be repaired and there will not be data loss. You can check the iPhone is rebooted and enter the screen lock interface if you have set the screen password.

Related Articles:

  1. 5 Effective Solutions to Fix iPhone White Screen of Death
  2. How to Fix iPhone Screen Goes Black Randomly
  3. Fixed: iTunes Stuck on Waiting for iPhone
  4. 8 Easy Methods to Fix iPhone Keeps Restarting Itself  


How to Recover Deleted Videos from PC in Windows 10

$
0
0

 If you unintentionally delete videos in Windows 10, is there any way to recover them? The answer is YES! You can recover the deleted videos from your computer in a high success rate as long as you get a right way. In this post, we will introduce to you three effective ways to recover videos from PC in Windows 10.

  • Way 1: Recover deleted videos from Recycle Bin
  • Way 2: Recover deleted videos with data recovery tool
  • Way 3: Recover deleted videos by Windows 10 Backup

recover deleted videos from pc in windows 10

Way 1: Recover deleted videos from Recycle Bin

Recycle Bin in Windows 10 is used to store the deleted files or folders temporarily before they are permanently deleted by user. When you delete video by accident or find that the video is lost from your computer, the first choice that you should consider is to recover it from Recycle Bin. Here is how to do.

Step 1: Double-click the icon of Recycle Bin on the desktop to open it.

Step 2: Type .mp4in the search box in the top right corner of interface.

Step 3: The deleted videos of mp4 format will be shown on the screen. Right-click the video that you want to restore and select Restore option. Finally, the deleted videos will be restored to the original location.

recover deleted videos from recycle bin

Way 2: Recover deleted videos with data recovery tool

If you can’t find out the deleted videos in Recycle Bin, it may be deleted permanently from your computer. In this case, you can use data recovery tool to recover the deleted videos. iSunshare BitGenius is a powerful and trustworthy data recovery tool that can recover lost data from NTFS&FAT32 partition or drives in Windows computer. It can also help you easily recover the deleted videos in Windows 10. Here are detailed steps.

Step 1: Downloadand install iSunshare BitGenius on your Windows 10 computer.

Step 2: Launch it and click the hard drive that the deleted video located in the Hard Disk Drivessection. If you remember the detailed location of deleted video, you can choose to customize a location to find it more quickly. Then click Start button.

select hard drive

Step 3: The tool will take some time to scan the deleted files. Once completed, all the lost files including videos will be displayed on the interface. Then click Filterbutton. In the new popup window, check the checkbox of Videos and then click Apply button. Then all the deleted videos will be shown on the right pane. Select the videos that you want to recover and click Recover button.

filter videos from the scanning results

Step 4: Select a location for the deleted videos.

select location

Step 5: At last, the deleted videos are restored to your computer. Then a tips box pops up to ask you if open the recovery folder. Click Yes button and you will see all the deleted ppt files are recovered successfully.

click yes

Way 3: Recover deleted videos by Windows Backup

There is a feature named Windows Backup in Windows 10 that allows you to back up the partition as you want. If you turn on this feature, the system will automatically back up your partition on schedule. So, if this feature is turned on in your Windows 10 computer, you can try to restore the partition to get the deleted videos back.

Step 1: Open Control Panel and click Backup and Restore option.

click backup and restore

Step 2: Click Restore my files button.

click restore files

Step 3: In the new popup window, click Search button.

search

Step 4: In the search box, type .mp4 and click Search button. Then all the video files are displayed on the screen. Check the checkbox of the video that you want to restore and click OK button.

select the videos that you want to restore

Step 5: Click Next button.

next

Step 6: Select a location and click Restore button.

restore

Step 7: Finally, the deleted video is restored successfully. However, the downside of this way is that you just can restore one video file at one time.

finished

How to Fix My iPhone Keeps Turning Off Randomly

$
0
0

 Do you encounter your iPhone keeps turning off randomly by itself? It must be very frustrating. Take it easy! This post is specially prepared for this situation. In this post, we will explain why your iPhone keeps turning off randomly and show you five effective methods to fix this issue in ease.

  • What causes an iPhone to keep shutting down randomly?
  • Method 1: Force restart your iPhone
  • Method 2: Update iOS version to the latest
  • Method 3: Fix with iOS repair tool without data loss
  • Method 4: Restore with iTunes in Recovery Mode (loss data)
  • Method 5: Contact Apple Support
  • Conclusion
how to fix iphone keeps turning off randomly

What causes an iPhone to keep shutting down randomly?

There are various kinds of reasons why an iPhone keeps shutting down randomly. Some main causes are listed as follows.

Unstable iOS update. The process of iOS updating is interrupted for various reasons causing there is something wrong with iOS. As a result, iPhone keeps shutting down suddenly.

Hardware Problem. If iOS is stable, it is very likely that there is something wrong with hardware like screen or motherboard. A broken hardware component could be the culprit of iPhone turns off randomly.

Unstable driver: If a driver on the iPhone is unstable because of damage to the internal system of the iPhone, it may also cause the iPhone keeps turning off randomly.

Method 1: Force restart your iPhone

Restarting your iPhone is a simple and worth trying way to fix any issue of iPhone. If a normal restart cannot work, you can try to force restart it. The ways to force restart iPhone vary depending on iPhone model.

iPhone 8 and later

Press and release the Volume Up button. Then press and release the Volume Downbutton. Finally, press and hold the Side button and then release when the Apple logo appears.

iPhone 7/7 Plus

Press and hold the Volume Down button and the Power button at the same time and then release both when the Apple logo appears.

iPhone 6 and earlier

Press and hold the Home button and Power button at the same time and then release both when the Apple logo appears.

how to force restart iphone

Method 2: Update iOS version to the latest

A new iOS version can fix some software issues and system bugs. If the iOS version of your device is outdated, you can follow the steps below to update iOS version to the latest to fix this issue of iPhone keeps turning off randomly.

Steps: Go to Settings> General> Software Update. If a new iOS update is available, a notification will be displayed. Then tap Download and Install. Wait for a moment and the iPhone will reboot up when the update is finished.

update ios version

Method 3: Fix with iOS repair tool without data loss

System errors could be the culprit of iPhone keeps turning off by itself. In this case, repairing iOS is the way out. iSunshare iOS Repair Genius is recommended here to fix the issue of iPhone keeps turning off randomly. As a powerful iOS repair tool, iSunshare iOS Repair Genius can fix various types of iOS problems without further ado.

Preparations:

1.     Download and install this tool on your Windows computer.

2.     Make sure that your iPhone is connected to computer.

3.     Install iTunes to make this tool run more smoothly.

Step 1: Firstly, launch this tool and click Standard Mode on the left side. Then click Start button on the next page. If your iPhone is well connected with computer, click Next to move on.

select repair mmode

Step 2: Then the tool will detect your device and show you the available firmware package. ClickDownload button to download it.

download firmware package

Step 3: Once downloaded, it will be verified automatically. Then click Repair button to start fixing your device. After a while, a popup dialog tells you it has been repaired successfully. Finally, you will get a new iPhone that can work normally.

repair iphone

Method 4: Restore with iTunes in Recovery Mode (loss data)

If you don’t care about the data on your iPhone, you can try to restore it to factory settings with iTunes. Detailed steps are listed as follows.

Preparations:

1.     Download and install iTunes of latest version on your computer.

2.     Connect iPhone to computer and put it into Recovery Mode. If a message box pops up asking if trust this computer, click Trust to continue.

Steps: Open iTunes and it can detect your iPhone automatically. Select your device when it appears on iTunes screen. Then Click Restore [your device]. On a popup window, click Restore again to confirm. It will take some time to erase your device and install iOS of new version. Once finished, your device will be factory reset and reboot up automatically.

restore iphone with itunes

Method 5: Contact Apple Support

If all the methods above don’t apply to you, there is a high probability that the hardware of device is broken such as motherboard or battery. In this case, you need to send it to Apple store to get it repaired.They can offer the best support options to help you solve all kinds of hardware issues.

Conclusion

No matter what causes your iPhone to turn off by itself, as long as you read this guide and follow the detailed steps above, your device can get back to normal in most cases. If your iPhone or iPad always encounters with system problems like stuck in spinning wheel, white screen of death or lagging and freezing, it is highly recommended to use iSunshare iOS Repair Genius to fix these issues. It can enable you to easily fix most common iOS system problems like an expert.


How Can I Edit A Secured PDF without Password

$
0
0

 “I got a PDF from my teammate and I was going to edit some of the content. But when I entered the password, it says the permission password is wrong. Now I failed to contact my teammate as he was on holiday. So, how can I edit a secured PDF without a password?” 

Generally, when we secure the PDF with a permissions password, we do not want others to copy, edit or print the content. But when you forgot the PDF permission password, how to edit a secured PDF without a password? In this article, we summed up three common methods for you. 

Method 1: Official Method from Adobe Acrobat 

Method 2: Manually Remove Edit Restriction of PDF via Google Chrome 

Method 3: Easy to Edit a Secured PDF with Professional PDF Permissions Remover 

Method 1: Official Method from Adobe Acrobat 

We found a solution from the Adobe help center, which enables users to make the secured PDF editable. But this method can only apply to the situation that you are the PDF owner.

Step 1: Open the secured PDF with Acrobat DC.

Step 2: Access File >Print. 

Step 3: In the pop-out prompt, select Adobe PDF as the printer and then hit the Print option. 

Step 4: Enter a new name for the PDF file and then click on the Save button. After that, you can get a new PDF file without the limitation. You can open and edit it freely in Acrobat. 

print option

Method 2: Manually Remove Edit Restriction of PDF via Google Chrome 

There is a built-in PDF reader in Google Chrome. You can take advantage of it to unsecure a secured PDF file. But you must make sure that the PDF print function is not restricted. Otherwise, you will not succeed in removing the PDF permission password so as to edit the PDF. 

Step 1: Launch Google Chrome and then drag & drop the protected PDF into Google Chrome browser. 

Step 2: Click on the Print icon once you access the PDF. If there is a document open password, you need to enter the password to get the PDF viewed. 

Step 3: Check the Save as PDF option and hit the Save button. 

Step 4: After that, you can open the PDF in Adobe Acrobat again and edit the content in your way. 


Method 3: Easy to Edit a Secured PDF with Professional PDF Permissions Remover 

There is a much easier way to remove the limitation on PDF content. You can try the professional PDF password permission remover tool—iSunshare PDF Unprotect Genius to regain the ability to edit, copy and print. This tool deserves your trust as it would never do harm to the PDF content. If you forgot the PDF permissions password, this program will help to remove the restriction of PDF in minutes. What a time-saving tool! 

iSunshare PDF Unprotect Genius gives you the option to open the unprotected PDF directly without entering any password. Moreover, it supports you to remove the secured PDF with the known document open password. 

Step 1: Download and install the application on your Windows computer. 

install iSunshare PDF Unprotect Genius

Step 2: Click the folder icon on the first section to import the secured PDF. 

import secured PDF

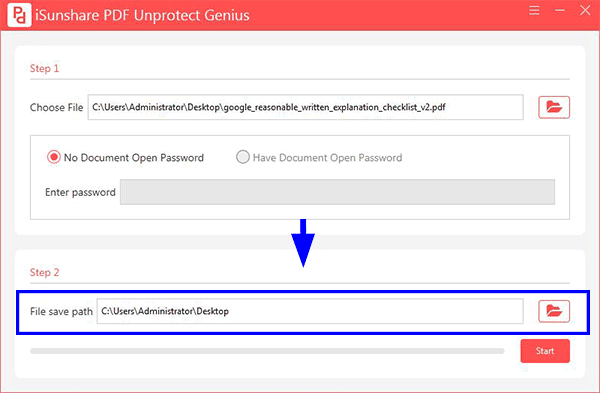
Step 3: The default destination location is on your computer desktop. You can change the location to save your unprotected PDF.

set PDF destination path

Step 4: Click the Start button to remove the PDF restriction. In the end, a message box will pop up to notify you that “Successfully Removed! Open it now?” You can click on the OK button to view and edit the content. 

successfully removed PDF restriction


How to Transfer Contacts from iPhone to PC without iTunes or iCloud

$
0
0

 Contacts play an essential role in our lives.  In today’s digital life, you have many activities that are associated with contacts. For example, Facebook will recommend your friends, according to your iPhone contacts.  Thus, it is highly recommended to export all contacts from iPhone to your PC.  In this article, we will share with you the details about how to transfer contacts from iPhone to PC.

transfer contacts from iPhone to pc

Way 1: Backup Contacts from iPhone to PC via iTunes

 iTunes is well known to all Apple users as it offers a convenient way to sync iPhone data to the computer. But to backup iPhone contacts from iPhone to Windows PC, you need to backup all the iPhone data as iTunes does not allow you to backup only contacts to the computer.

Step 1: Update your iTunes on the computer and then plug the iPhone into your computer. iTunes will detect the iPhone and sync the data.

Step 2: You need to tick the iPhone icon and click on the Summary option. After that, you can see the Backups part in the right panel.

Step 3: Choose This Computer option under Automatically backup part and then click on Back Up Now option under Manually Back Up and Restore section.

backup iPhone to this computer

Step 4:  The iPhone data is backed up.  Contacts are saved on your computer. You can restore it to your iPhone when it is needed.

the iPhone is backed up

Way 2: Export iPhone Contacts from iPhone to PC without iTunes

 If iTunes fails to sync your iPhone data but only offers the restore option, you can use iCloud to export iPhone contacts from iPhone to PC.

Step 1: First of all, you should enable Contacts to sync on iCloud on your iPhone.  Just go to Settings > iCloud > Contacts and then turn it on.

Step 2: Sign in to the iCloud official website and then click on the Contacts option.

sign in iCloud and choose Contact

Step 3: Then all contacts on the iPhone will be loaded. You just need to click on the setting icon on the bottom-left corner and then choose Export vCard. In no time, the contacts will be downloaded on your PC.

export contact to your PC


Way 3: Transfer iPhone Contacts to PC without iTunes and iCloud

 When your iCloud is out of storage and iTunes fails to back up the iPhone data, how could you backup contacts to the Windows computer? iSunshare iSyncGenius offers you a much easier way to transfer only contacts from iPhone to PC.  You can keep multiple contact files on the computer.

Step 1: Build the connection between the iPhone and your PC via the USB cable. After that, open the application. At the same time, unlock your iPhone and click Trust in the pop-out box that asks for your permission.  In no time, iSyncGenius will recognize your iPhone.  If the iPhone is set with the backup password, enter the password and click on the Next button.


load iPhone in iSyncGenius

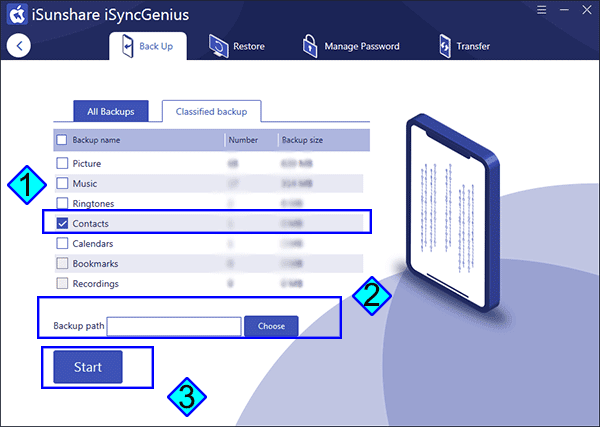
Step 2: Click on the Classified backup option and then iSyncGenius will load the iPhone data. Now tick the Contacts option and set the path to save the contacts backup file.  Afterward, click the Start button.

select Contact option to backup

Step 3: When the process ends, you can go to view the contacts on your Windows computer. They are saved as XML file. 


Related Articles:

  1. How to Backup iPhone to Windows Computer with or without iTunes 
  2. How to Transfer Photos from iPhone to Laptop on Windows 10
  3. How to Restore Contacts on My iPhone from Backup 
  4. How to Sync iPhone to iTunes after Passcode Forgot  

How to Backup Different iPhones on the Same Windows Computer

$
0
0

 I and my wife both using iPhones and we just got one Windows computer. Of course, both of us want to backup the phones regularly. But iTunes can not intelligently recognize they are two different iPhones and make the backup. Is there a way to backup two iPhones to one computer?”

I came across this question on the Reddit forum. Many people share their answers to this question. Some said you can just backup the two iPhones to one computer using one Windows account as the data will not be mixed; some said you can just go ahead to set up the second iPhone as the new iPhone and restore the backup because there is no data loss; Some recommends the third-party tool to finish the iPhone data backup. After going through these answers, I also have my own doubt: Can iTunes help to backup different iPhones on the same Windows computer?

The answer is definitely “Yes”.  You can backup different iPhones on the same Windows computer via iTunes. In order to verify this answer, several iPhones in different models are tested here.


backup different iphones in one same Windows computer


Test 1: Backup Two iPhones on One Windows Computer –Both can Easily Back up

In this test, iTunes does not log in to any account. And the two iPhones are connected separately.

Step 1: Connect iPhone 6s with the Windows computer and run iTunes. iTunes can quickly detect the iPhone.

Step 2: Go to click the small iPhone icon and then all information about the iPhone is classified. Hit the Summary tab on the left menu and then get iPhone 6s details and Backups parts.

Step 3: Check the box of This Computer and then click the Back Up Now button. iTunes can help to automatically back up the iPhone 6s data immediately.


back up one iphone to computer

Step 4: After the completion, disconnect the iPhone 6s and then connect another iPhone –iPhone 8.  Next, just repeat the operations in Step 2 and Step 3, the iPhone 8 is backed up to the Windows computer in minutes.


back up another iPhone to computer

Both backup processes is completed successfully and did not come across any issues.  The two iPhone for testing is in the same iOS version.

Test 2: Backup Two iPhones on One Windows Computer –The Second One Needs to Set up as New iPhone

Another iPhone is chosen here for test—iPhone XS.  I plug the iPhone 8 out and reconnect the iPhone XS with the computer. At this time, when iTunes is opened, I only got the Welcome to Your New iPhone window. After choosing to set up the iPhone XS as the new iPhone, iTunes will know this iPhone is another device and create another record. If you insist in restore the iPhone from backup, actually, you will lose all the iPhone data and restore from other iPhone’s backup.


set up another iPhone as  new iPhone

 To get this issue solved, I search online and find the solution: Try to connect the two iPhones in different Windows account and then precede the iTunes backup. It means that you need to create two accounts to sign in to Windows. But in my opinion, I would rather try other ways to backup different iPhones on a computer.

Alternative Ways to Backup Multiple iPhones on the Same Windows Computer

Yes, from the above two tests, it seems that iTunes is not the best choice to backup different iPhones on the same Windows computer. I found the alternative tool—iSunshare iSyncGenius. This software can help to transfer iPhone data to Windows computers quickly and safely. What’s more important, it can separately store the backups for different iPhones even the backup path is the same.  Amazing? Yes, you can backup as many iPhones on one computer safely. Let’s see how it achieves.

Step 1: Connect the iPhones you want to back up to the Windows computer.  It is no need to connect the iPhone separately.

Step 2: Run iSyncGenius and then the backup interface is on.  You can click the drop-down icon on the Device model to choose the iPhone which you want to backup firstly. Here, iPhone 7 is chosen.  After that, click the Next button to continue.


select iPhone to back up

Step 3: In the next interface, All Backups are selected by default. This function is similar to iTunes Backup Now. You can get the listed data backed up after finishing.  After that, click the Choose button and pick the destination to save your iPhone backup data. It can be anywhere on your Windows computer.  When the backup path is set, just go to click the Start button to begin the process.


set backup path to save your iPhone backup

Step 4: The iPhone data will be backed up in minutes.  Then you can click the Finish button and repeat Step 2 and Step 3 to back up other iPhones.


finish iPhone backup


In the end, you can go to check the backup files in the destination folder. As I saved the backup in the same folder, I can find all those iPhone backups conveniently.


multiple iPhone backups in Windows computer

Someone may ask how to restore the backup if you need it. Don’t worry; you can also utilize the Restore function of this software to restore the iPhone backup. 


Related Articles:

  1. How to Transfer Backup Data to New iPhone
  2. How to Backup iPhone to Windows PC
  3. How to Backup iPhone to External Hard Drive on Windows and Mac
  4. How to Backup Your iPhone Through iTunes 

How to Import Photos from iPhone to PC

$
0
0

 If there are many photos on your iPhone and you want to transfer photos from iPhone to PC, how to do that in the fastest way? There are many ways for you to import photos from iPhone to a Windows computer. You can choose the one you preferred to import iPhone photos.


import photos from iPhone to PC

Way 1: Connect iPhone to PC and directly copy iPhone photos

You can connect the iPhone to the PC with the original USB cable. After that, allow the computer to access photos and videos on the iPhone. Then, go to open This PC and choose Apple iPhone ( the device name), and access Internal Storage> DCIM. Here you can find different folders with images and videos. You can directly copy the photos and then paste them on your PC.
import photos directly from iPhone to PC

Way 2: Import Photos from iPhone to PC via iCloud

You can enable the iCloud backup on your iPhone so that the photos will be automatically backed up to iCloud when iPhone is connected to a WiFi network. After that, you can import photos from iPhone to PC on the iCloud website or iCloud app.

Step 1: Sign in to icloud.com with the Apple ID linked to your iPhone.

sign into iCloud

Step 2: After entering the iCloud home interface, you can go to click the Photos option.

click Photos

Step 3: In no time, it will load all the photos which are backed up from your iPhone. You can select the photos and then click the Download button.  Instantly, the photos will be downloaded on your Windows PC.

select photos to download from iCloud

Finally, you can move the download zip to any folder of your computer and decompress it.  You will see photos from iPhone soon.

Way 3: Transfer photos from iPhone to PC via iSunshare iDevice Genius

iSunshare iDevice Genius is a useful iPhone cleaning software that can help to delete iPhone junk files. But it can also help users to export photos, videos, documents, and other large files to your PC. Before that, you are able to preview photos one by one and choose the needed photos to export.  It is also possible for you to classify photos by Year, Month, or Day.

Step 1: Connect the iPhone to your computer and then open the iSunshare iDevice Genius program.

Step 2: Fast Cleanup option is selected by default. Then you can click the Scan button to get more details.

click Scan to scan iPhone

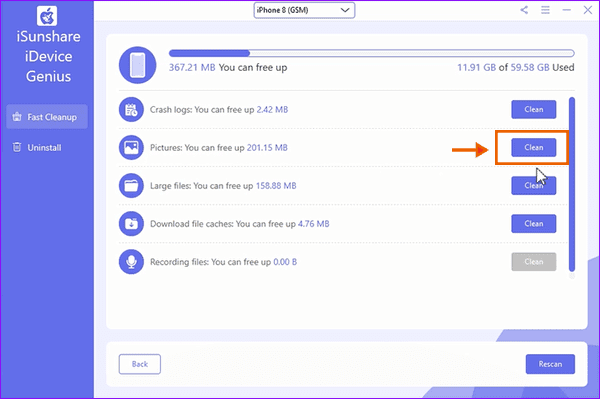
Step 3: After the scanning, you can directly go to the Pictures section and click the Clean button.

click Clean in Pictures section

Step 4: In this interface, you can double-click to preview the photo. And then you can choose the picture one by one. If you want to transfer all photos from iPhone to PC, you can check the Check all option on the upper left corner.

Check all photos

Step 5: Click the Export button and then choose the folder to save these photos. After that, the software will start exporting photos to your PC automatically.

click Export

Step 6: The files are successfully transferred to your PC. You can go to the destination folder to have a check. 

Photos are transferred successfully

Related Articles:

  1. How to Transfer Contacts from iPhone to PC without iTunes or iCloud
  2. Fixed--Can't Import Photos from iPhone to Windows PC
  3. How to Delete Photos from iPhone on Windows 10 PC
  4. How to Transfer Photos from one iPhone to another without iCloud 


How to Clone Existing Windows to USB and Make it Bootable

$
0
0

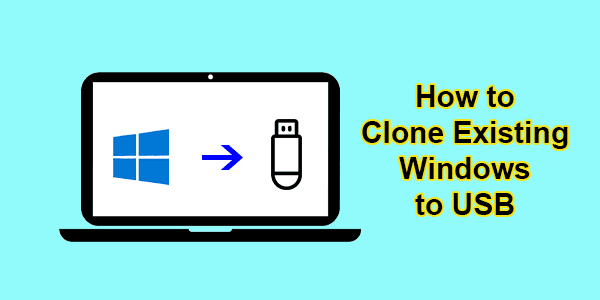
 Is it possible to copy Windows 10 to USB and make it bootable? Yes, you can clone existing Windows OS to a USB drive and then take it to anywhere. If needed, you can boot from the USB and then work in the familiar Windows OS.  How to do that? iSunshare WinToGo Genius can help you clone everything in your working OS to the USB drive and make it bootable. It is easy to do the cloning with WinToGo Genius.

clone existing Windows to USB


Preparation to clone Windows to USB drive

When your Windows computer fails to boot or crashes, the bootable USB with the Windows system can help you back to work quickly. So, in order to make Windows OS successfully clone to the USB drive, what should you prepare?

The reliable Windows to Go Creator.

Yes, you need the help of professional Windows To Go Creator –iSunshare WinToGo Genius. If you just copy and paste the Windows files and data to the USB drive, it is difficult to make the Windows bootable from USB. But for iSunshare WinToGo Genius, it can clone the configurations, settings, and data of the Windows OS to your USB drive. And this process is made in PE mode, in which there is no app running in Windows OS, to ensure 100% cloning. 

Get a larger USB drive

The USB drive should be large enough to store all data from the system drive. It should be larger than the used space on your system drive. You can choose the USB flash drive or the external hard drive that can be connected with the USB-to-SATA adapter. Also, it is better to choose the empty USB drive as this cloning will destroy all the data on the USB.

How to Clone Existing Windows to USB

iSunshare WinToGo Geniuscan work in any edition of Windows 7/8/10/11, which makes it easy for users to copy the Windows to USB. Besides, you can also create portable Windows on USB without installing from ISOimage file.

Step 1: Install iSunshare WinToGo Genius on your computer. At the same time, plug the USB drive into your computer.

install iSunshare WinToGo Genius

Step 2: Select the USB drive to store everything about your Windows OS.

select the USB drive

Step 3: Choose the first option Use the native system and then you can check two options to make PE:  Use the PE file on your computer or Use the PE file you downloaded. You can choose either one to proceed with.  As there is the built-in PE file on the computer, you can directly choose to Use the PE file on your computer and click the Start button.

use the PE file on your computer to make PE

Step 4: Here comes the warning—this operation will format the USB drive. You can click Yes to continue if you have backed up the data on your USB drive.

format USB warning

Step 5: The software will start to make PE in the USB drive with your built-in PE file. You just need to wait for the ending. With the accomplishment of the PE, you can click OK and then close the software.

finish PE production

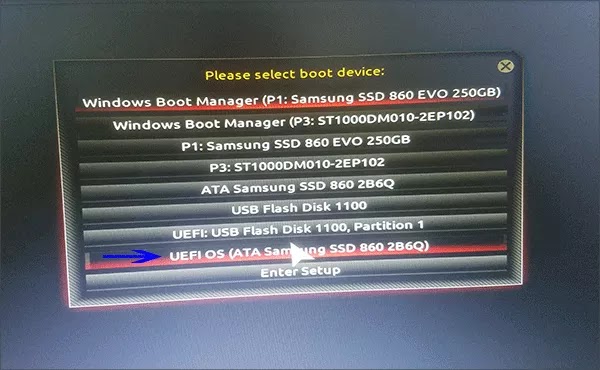
Step 6: Restart the computer and then press F12 or other keys to enter the BIOS boot settings. After that, choose to boot the computer from a USB drive.

boot from USB drive

Step 7: In no time, iSunshare WinToGo Genius will begin cloning the existing Windows OS to your USB automatically. You just need to wait for the ending.


copying Windows to USB

After that, you successfully clone the existing Windows to USB. You can take the USB to any Windows computer and boot from it to get into the identical Windows working environment.

Related Articles:

  1. How to Clone External Hard Drive to another External Hard Drive in Windows
  2. How to Clone USB to another USB in Windows 10/8/7
  3. How to Create A Windows To Go USB Drive without the Enterprise Edition
  4. How to Run Windows 10 from USB without Installing 


How to Factory Reset iPhone without Passcode or iTunes

$
0
0

 There are many reasons you want to factory reset your iPhone: you forgot the iPhone passcode, the iPhone is disabled, and you got a second-hand iPhone and the iPhone screen passcode does not work, and so on. If you do not have the iPhone passcode, is it possible to factory reset the iPhone without the passcode or iTunes? You can learn effective ways in this post.

factory reset iPhone without passcode or iTunes

Way 1: Directly tap Erase iPhone to reset iPhone when forgetting the passcode

When you forgot your iPhone and tried several wrong passcodes, you can see the iPhone unavailable message. And if you keep trying, the Security Lockout message will come. At that time, you can see two options below: Emergency and Erase iPhone. Then you can reset the iPhone to factory settings with the Apple ID password. But this option can only apply to iOS 15.2 and later iPhone. Also, the unavailable iPhone should be connected to a cellular or WiFi network.

Step 1: Keep entering the wrong passcode until you see the Erase iPhone option on the bottom right corner. This process might last for a long time as the iPhone will ask you to try again in 15 minutes or 1 hour once you enter too many wrong passwords.

Step 2: Tap Erase iPhone option and then it will ask you to enter the Apple ID password for the account which is used on the iPhone. After the Apple ID password is entered, your iPhone will be erased instantly. After minutes, all data are destroyed. And you can set it up as a new iPhone.


click Erase iPhone option to reset iPhone


Way 2: Factory reset iPhone without passcode using iTunes

You can factory reset your iPhone without a password using iTunes. But it requires you have synced your iPhone with iTunes before.  Before resetting the iPhone to factory settings, you can use iSyncGenius to back up the locked iPhone data in advance.

Step 1: Connect the iPhone to your computer and then launch iTunes.

Step 2: Go to tap the Summary option and you can check the Restore iPhone option on the right. Click Restore iPhone option and then the Restore button on the confirmation pop-out.

Step 3: After minutes, you can access the iPhone and then finish the iPhone setup according to your needs.


restore iPhone in iTunes

Way 3: Factory reset iPhone without passcode or iTunes via iCloud

If you have enabled Find My iPhone on the locked iPhone, you can factory reset locked iPhone without passcode or iTunes via iCloud. In addition, you need the Apple ID and its password to access iCloud website.

Step 1: Sign into iCloud.com on any device or computer. Then enter the Apple ID and password which is used on the locked iPhone to sign into iCloud website.

Step 2: Hit on Find iPhone option and then go to All Devices page.


hit on Find iPhone option

Step 3: Choose your locked iPhone from the drop-down menu of All Devices.


choose locked iPhone

Step 4: Hit on Erase iPhone option and then the Erase button. In no time, your iPhone will be factory reset automatically.


click Erase iPhone on iCloud

Way 4: Factory reset iPhone without passcode or iTunes or iCloud via iPhone Passcode Genius

If the Erase iPhone option does not appear on your iPhone, or the iTunes cannot recognize your iPhone, you can use iSunshare iPhone Passcode Genius to remove iPhone unavailable screen without passcode or iTunes. Also, there is no need to know your Apple ID password to unlock a locked iPhone.

Step 1: First, launch iSunshare iPhone Passcode Genius and then choose Unlock Lock Screen option.


choose Unlock lock screen

Step 2: Click Start and then connect your locked iPhone to the computer.


click Start

If the software cannot detect your iPhone, go to put the iPhone into recovery mode by following the on-screen instructions.

Step 3: On this interface, you can customize the firmware package save path and then click the Download button.  After that, the software will download the firmware package for you.


set Save path and click Download

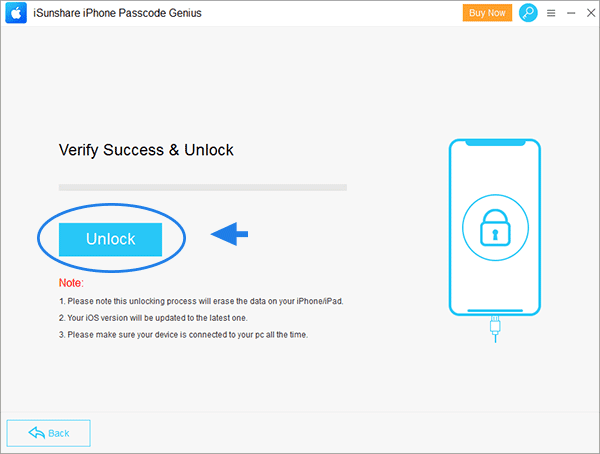
Step 4: Minutes later, you will go to the unlock interface.  Click the Unlock button and then the iPhone screen lock will be removed in seconds.  You can go to check your iPhone and set it up again. 

click Unlock

Related Articles:

  1. Forgot iPhone Passcode—Unlock It without Restore 
  2. How to Hard Reset iPhone with or without Passcode
  3. Simple 2 Ways to Factory Reset iPhone without Apple ID Password 

How to Open and Extract ISO Files on Windows 10

$
0
0

 An ISO image file is an archived document that contains all kinds of content: applications, music, videos, installation files, and so on. You can easilycreate ISO files from files, folders, and CD/DVDs.  But if you get an ISO file from others, how can you view the contents without burning it to a disk or a drive?  You can get multiple ways to open and extract ISO files on Windows 10 computer.

  • Way 1: Double-click to mount ISO files to view contents
  • Way 2: Mount ISO image from the context menu
  • Way 3: Mount ISO Image from the ribbon menu
  • Way 4: Extract ISO files via WinRAR
  • Way 5: View ISO files contents with iSunshare ISO Genius
extract ISO files on Windows 10


Way 1: Double-click to mount ISO files to view contents

There is a built-in disk image tool in Windows 10 computers so that you can easily mount the ISO image file to a virtual disk. You can easily open the virtual disk to see all contents extracted from the ISO file.

Step 1: Navigate to the folder where the ISO image file is located.

Step 2: Double click on the ISO image file to mount it.

double click ISO file

Step 3: Once mounted, you will be directly guided to a DVD drive under This PC. Here you can view all the files and folders that are stored in the ISO image.  You can directly open the files or folders to get what you want.

ISO image file is mounted


Way 2: Mount ISO image from the context menu

 Alternatively, you can mount an ISO image from the context menu.

Step 1: Go to where your ISO image file is stored. Right-click it and then you can choose the Mount option from the context menu.

Step 2: In no time, you can see all data extracted in a virtual drive. Here, you can easily manage the contents the same as you are on the real disk in Windows 10.

choose Mount option


Way 3: Mount ISO Image from the ribbon menu

You can also open and view the contents of the ISO image from the ribbon menu.

Step 1: Reach the ISO image file on your computer and then choose it.

Step 2: Click the Disc Image Tools on the ribbon menu.

click Disc Image Tools

Step 3: Choose the Mount option. Immediately you can get all contents from the ISO mounted to a virtual disk.

click Mount option


Way 4: Extract ISO files via WinRAR

WinRAR is a popular compression tool as well as an archiver extractor, which needs to pay for usage. But you can enjoy a free trial period to compress and extract the files. This tool can also help to extract files from disk images on Windows 10.

Step 1: Download and install WinRAR on your computer.

Step 2: Navigate to your ISO file. Right-click on it and choose Extract to “filename”.

choose Extract to option

Step 3: Soon, all contents of the ISO image are extracted to a folder with the same name.

ISO image file is extracting


Way 5: View ISO files contents with iSunshare ISO Genius

 iSunshare ISO Geniusis the free ISO file extractor for PC that can help you to extract all contents from the ISO file. You can also burn the ISO file to a USB drive and create a unique ISO file with this free utility. If you are running Windows 7 or the lower version, the Windows disk image tool is not available for you. You can free download this software to extract and view ISO file contents. ISO Genius is compatible with all Windows operating systems.

Step 1: Download and install iSunshare ISO Genius on your Windows 10 computer.

Step 2: Run the software and then choose the Extract module.

choose Extract module

Step 3: Click the folder icon to select the ISO file to extract.

choose ISO file to extract

Step 4: Instantly, you can check the files and folders from the ISO file. Until now, it is unavailable for you to open the files. You need to choose the files or folders to export.  After you make the selection, click the Export button on the bottom right corner.

select files to export

Step 5: Select a folder on your Windows 10 computer to save the extracted content.

set the save path

Next, click the Start button to export the extracted contents to your computer.

click the Start button

Step 6: Successfully exported the extracted contents from the ISO image. You can click to open and view the contents. 

click View files

Related Articles:

  1. How to Make Windows 10 Bootable USB from ISO Image 
  2. How to Burn ISO to USB File on Windows 11/10/8/7 Computer
  3. How to Create ISO Files in Windows 10 Computer 


Fixed: Windows 10 Mount ISO Missing

$
0
0

In Windows 10, the Mount ISO option is available by default, just right-click on the ISO file and click on Mount, or you can double-click on the ISO file. But if the Mount option disappears on the context menu, how do you fix it on your Windows 10. In this step-by-step tutorial, we show you how to fix Windows 10 mount ISO missing.

  • Part 1: Fix Windows 10 Mount ISO Missing without software
  • Part 2: Alternative way to Mount ISO in Windows 10 with Freeware iSunshare ISO Genius

right-click ISO file and click on Mount

Part 1: Fix Windows 10 Mount ISO Missing without software

  • Option 1: Fix Windows 10 Mount ISO Missing from Settings
  • Option 2: Fix Windows 10 Mount ISO Missing Using Control Panel
  • Option 3: Fix Windows 10 Mount ISO Missing from Properties

Option 1: Fix Windows 10 Mount ISO Missing from Settings

Click on the Start menu, then negative to Settings>Apps>Default apps>Set defaults by app, and then scroll down and click the Windows Disc Image Burner option. 

click on Windows Disc Image Burner

In the Windows Disc Image Burner window, make sure you've chosen Windows Explorer as default app. 

Windows Explorer is default app


Option 2: Fix Windows 10 Mount ISO Missing Using Control Panel

Step 1: Search for Control Panel from the Search box on the Taskbar and open it.

open Control Panel

Step 2: Click on the Programs option.

select Programs

Step 3: Click on the Default Programs option.

select Default Programs

Step 4: Continue to click on the Set your default programs option.

select Set your default programs

Step 5: You will then go to the Settings page, all the next steps are the same as Option 1.


Option 3: Fix Windows 10 Mount ISO Missing from Properties

Step 1: Right-click the ISO file and select Properties from the context menu.

Step 2: Click Change to choose how to open the ISO file.

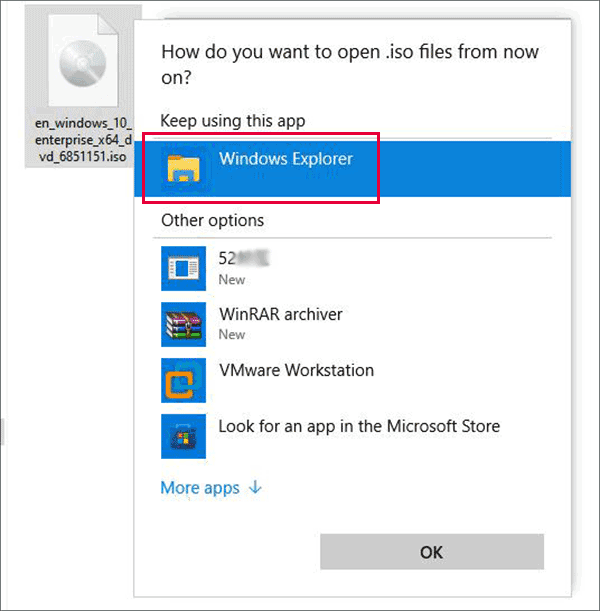
Step 3: Choose Windows Explorer to open ISO files.

choose Windows Explorer

   Step 4: After that, please click Apply and click OK.

click Apply and OK


Part 2: Alternative way to Mount ISO in Windows 10 with Freeware iSunshare ISO Genius 

If these methods mentioned above still cannot help you fix Windows 10 mount ISO missing, you can try it with free third-party applications such as iSunshare ISO Genius. It is a powerful and time-tested ISO image tool that can help you extract ISO images. With it, you can easily mount an ISO image to open and view the files and folders stored in it. Heres how to fix Windows 10 mount ISO missing with iSunshare ISO Genius for free:

Step 1: Free download and install iSunshare ISO Genius on your computer.

Step 2: Click on the Extract button from the main interface.

click on the Extract button

Step 3: Click on the Folder icon at the top-right corner to select the ISO file. Then check all the files and folders that loaded by default. After that, click on the Export button to decompress files.

select ISO file to decompress

Step 4: Continue to click the "Folder" icon to select a path for decompressing files and click on the Start button to execute.

select a path for decompressing

Step 5: After that, you need to wait for exporting the contents of the ISO file.

exporting the contacts of ISO file

Step 6: After a few minutes, the ISO file will be exported successfully, then you can click View Files to view the contents of the ISO file.

successfully exported the ISO file

Conclusion:

If the Windows 10 mount ISO is missing, there are several ways to help you mount the ISO successfully in Windows 10, you can fix it from Settings, Control Panel, and Properties. Also, if you cannot fix Windows 10 mount ISO missing, iSunshare ISO Genius is the best alternative to help you mount ISO easily to view and open ISO files. iSunshare ISO Genius is a simple and easy-to-use tool for Windows users. It can not only extract ISO files, but also make bootable USB sticks, create ISO files from local files/folders, and convert CD/DVD data to ISO files.


Related articles


Easily Protect a PowerPoint Presentation from Being Copied

$
0
0

 If you have created a PowerPoint presentation and do not want others to copy, edit or modify the content, how can you do that?  Here, you can learn 4 effective ways to protect a PowerPoint presentation from being copied.

protect PowerPoint presentation from copied

Way 1: Set Restrict Access to the presentation

 You can enable Restrict Access function on the PowerPoint presentation so that no one can edit copy or print your file.

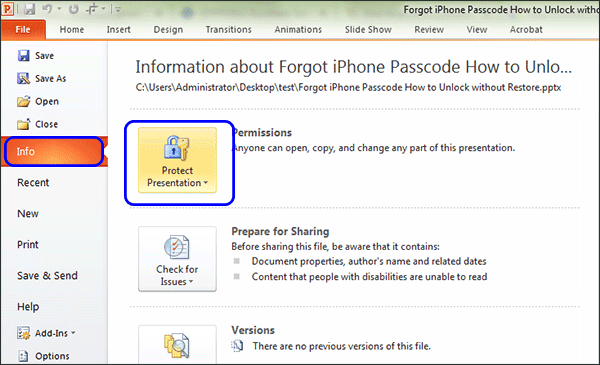
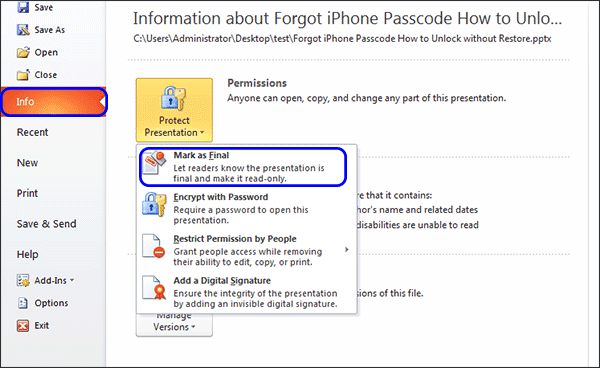
Step 1: Open your presentation and then go to click Info > Protect Presentation.

click Protect Presentation

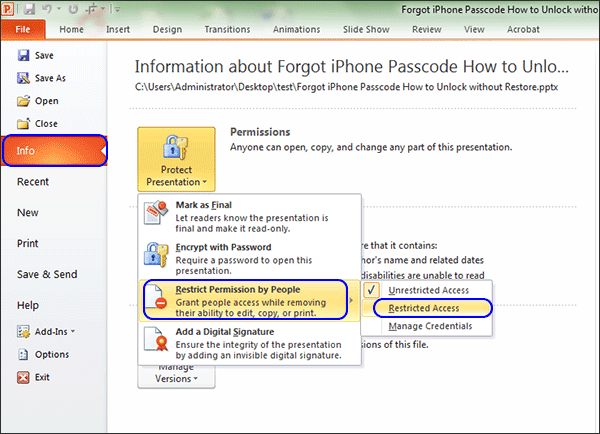
Step 2: Go to Restrict permission by people and choose Restricted Access.  After that, follow the guide to enable the restriction.

choose Restricted Access

In some versions of Microsoft PowerPoint, you can directly get Restrict Access option under Protect Presentation drop-down menu. 

Way 2: Make the presentation read-only

With the read-only setting, others can only view your presentation content but do nothing on it. It is a good way to prevent PPT files from editing.

Step 1: Open your presentation and go to click File> Info.

Step 2: Choose Protect Presentation on the right menu.

Step 3: Click Mark as Final and make your confirmation.

Choose Mark as Final

Way 3: Encrypt the presentation with modify password

If you do not want others to make changes to the PowerPoint presentation, you can add the modify password when saving the PPT file.

Step 1: When your presentation is open, go to click File> Save as.

Step 2: In the Save as window, go to Tools and choose General Options from the drop-down menu.

Click General option

Step 3: Enter the password you want to set in File sharing settings for this document part. After that, click the OK button to apply the change. 

enter password to modify

After that, the presentation cannot be modified without knowing the modify password.

Way 4: Protect your PowerPoint files with iSunshare SafeFile Genius

Sometimes files or folder is easy to set passwords or restrictions, what about a great number of files or folders? You can use iSunshare SafeFile Genius to lock, and hide files or folders, and make files read-only with simple clicks. Once you encrypt the presentations with this software, nobody can open, copy, or edit them.

Step 1: Run iSunshare SafeFile Genius and then click the Encrypt button.

hit on Encrypt

Step 2: Click on the file icon to select your PowerPoint presentation and then hit on the Next button.  If you have mass PPT files to encrypt, you can place the PPT files in a folder first. Then, click the folder icon to choose the folder to add.

select PowerPoint presentation

Step 3: Input the password you want to set for the presentation. You must ensure the password is longer than six. Click the Encrypt button to begin encrypting.

enter password to encrypt

Step 4: Successfully encrypted the PowerPoint presentation. 

successfully encrypt

Related Articles:

  1. How to Encrypt Files or Folders in Windows 10
  2. Fixed—Encrypt Contents to Secure Data is Greyed out in windows 11/10
  3. PPT File Password Reset after Forgot PowerPoint Password
  4. How to Unlock Read-only PowerPoint Presentations 

iPhone Unavailable No Erase Option-- How to Unlock Unavailable iPhone

$
0
0

 “My iPhone 7 says unavailable but there is no erase option. I only found an emergency option at the center. How can I get out of the unavailable screen on my iPhone?” 

iPhone unavailable no erase option


Generally, when you keep trying the wrong passcode on your iPhone in a row more than 7 times, the Erase iPhone option will appear along with an unavailable or security lockout message.  You can see the Erase iPhone option next to the Emergency option. 

If you find there is no erase option on the iPhone unavailable screen, what’s the problem? First of all, you should check the iOS version on your iPhone. If it is beyond iOS 15.2, you cannot get the Erase option after the iPhone becomes disabled or unavailable. The Erase option will only display on iOS 15.2 and higher versions. Secondly, if there is no SIM card on your iPhone, you cannot see Erase iPhone option sometimes. Finally, there may be a system error on your iPhone, which causes this issue after charging, updating, or resetting your iPhone. 

Thus, how can you unlock the unavailable screen with no erase option? You can get 4 solutions here.  No matter which method you choose, you can only unlock the unavailable iPhone with data loss if there is no data backup. So, create a backup of your iPhone from time to time. 

Now let us deep into the details to unlock unavailable iPhones with no erase option. 


Method 1: Unlock Unavailable iPhone using iPhone Passcode Genius 

iSunshare iPhone Passcode Genius is the professional iPhone unlock software that makes removing the screen lock without any passcode simpler. It can help to unlock unavailable or disabled iPhones on any iOS version. 

Step 1: Free download iSunshare iPhone Passcode Genius on your Windows computer. Then install it and activate it to get full features. 

Step 2: Launch the software and click Unlock Lock Screen section. Click Start to continue. 

click Unlock Lock Screen


Step 2: Connect the iPhone to your Windows computer via a USB cable. Then put the iPhone into recovery mode.  And click Next on your software interface. 

Click Next

Step 3: After loading your iPhone details, the software guides you to download the firmware package for the iPhone. Click Download to go ahead.  

click Download


Step 4: After the downloading is completed and verified, you will be on the Unlock interface. Hit on Unlock button and then the iPhone will be unlocked soon. 

click Unlock

Note: After unlocking, all contents on your iPhone will be erased.  You need to set up the iPhone from scratch.


Method 2: Reset Unavailable iPhone via iTunes or Finder

If you have synced the unavailable iPhone to iTunes or Finder, you can connect the iPhone to the Windows or Mac computer to reset your iPhone. Here, iTunes is set as an example. 

Step 1: Put your iPhone into recovery mode and then connect it to your computer.

Step 2: iTunes will automatically run and pop up a dialog box, which tells that the device has a problem so you need to update or restore the iPhone to erase all contents. You need to click Restore. 

click Restore


Step 3: Click the Restore and Update button and keep moving forward as prompted to trigger the process of downloading the latest iOS software and erasing your iPhone unavailable no erase option.

click Restore and Update


Step 4: This process will take a while so you need to wait patiently. You can track the process with the progress bar on your unavailable iPhone.  When it is finished, the iPhone will restart and boot up to the Hello screen which is exactly what you get when you first receive a new iPhone. You can follow up with the setup assistants to quickly set up the phone. 

erase iPhone process


Tips: If you have a backup for your content, Apple enables you to get back the data from the backup in the apps and data screen. When all is set up, you should unlock and regain access to your phone. 

Method 3: Erase Unavailable iPhone via iCloud 

What if your unavailable iPhone has no options for erasing or entering the password or face ID and you don’t have a computer or a USB cable, how do you fix an unavailable iPhone without a computer? You can erase the unavailable iPhone via iCloud.com on another iOS device when Find My iPhone has been activated on the phone before it says unavailable. 

Step 1: Get another device with a stable network and then open any browser on it. 

Step 2: Go to icloud.com and sign in with your Apple ID and password which is the same as your unavailable iPhone. If you have turned on two-factor authentication on your iPhone before, you need to enter the verification code. 

Step 3: You will be on the iCloud dashboard. Then click the Find iPhone icon in the lower right corner. 

iCloud dashboard


Step 4: Click All Devices to get all devices menu and choose your unavailable iPhone. 

choose your iphone


Step 5: Choose Erase iPhone option and click Erase button. iCloud will start erasing your available iPhone and deleting everything on your phone. 

erase iPhone via iCloud


Minutes later, your iPhone will be rebooted and the Hello screen shows up. You can set up the phone from scratch or restore it from iCloud or computer backup. 


Method 4: Fix unavailable iPhone via Find My App 

You can also use the Find My app on other iOS devices to erase the unavailable iPhone. Yes, the Find My iPhone function should have been enabled on the unavailable iPhone before. 

Step 1: Find an iPhone or iPad that you can access. Go to the home screen and tap Find My app. 

Step 2: Log in with the Apple ID and password which is used for the unavailable iPhone. 

Step 3: After logging in, find and choose your unavailable iPhone in the devices tab. Then swipe up and scroll down until you see erase this device option. Click it and enter the Apple ID to erase.  A few minutes later, your unavailable iPhone will be erased and on the Hello screen. You can quickly set it up and restore everything from iCloud backup or iTunes backup.  Finally, you can get into the unavailable iPhone. 


Solved--Windows Media Player Doubled All My Songs

$
0
0

 “My media player duplicates all the music files in my library when I open it. It is very annoying, can I fix it?” From Microsoft community. 

What to do if the Windows media player doubled all my songs/ music? How can you delete duplicate songs in the Windows media player? In this article, you can learn two effective ways to find supplicate files. 

solved-windows media player doubled all my songs

Part 1: Delete Duplicate Songs in Windows Media Player Manually 

Windows Media Player is used to play music or videos from a PC. You can check the songs in Windows Media Player libraries. Of course, you can manage to delete the duplicate songs on it. 

Step 1: Open Windows Media Player and then you can check all songs here. 

Step 2: Click the Title column and then all songs will be listed by Title. You can now compare the names, lengths, sizes, and so on to find duplicate songs. 

list songs by title

Step 3: Go to choose the duplicate one and right-click to choose Delete. Then you can remove duplicate songs one by one. 

delete duplicate songs

Step 4: You will get the message box to make a choice. Choose Delete from library and my computer and then click the OK button. 

choose delete from library and my computer


Part 2—Delete the repeated songs on your computer with iSunshare DupFiles Genius 

iSunshare DupFiles Genius is the best solution to solve Windows Media Player doubling all my songs. It is developed with the advanced MD5 algorithm so that it can quickly find the same songs for you. With this software, you can scan all different file types on one or more folders/drives, such as images, audio, documents, and so on. Besides, you can scan the external hard drive to find duplicate files to release space. 

Step 1: Choose the location to scan. 

Once launch the software, you can click the plus button to choose a folder or drives in that you want to find the duplicates. You can repeat this operation to add two or more locations. After that, click on the Next button. 

select song location to scan

Step 2: Define the scan settings. 

You can choose the folder to exclude and then choose the file type to scan. As duplicate songs are going to be found, you can choose only audio as the file type to get a more accurate report. Then, click on the Start scanning button. 

define the scan settings

Step 3: After minutes, you will get the duplicate files report. You can scroll down to check all. Then you can check the checkbox next to File Name to select all duplicate songs. Next, click on the Delete button. 

choose all duplicate songs to delete

Step 4: A message box will come out to inform you of the number of files to delete. You can click on the Yes button to continue. 

click Yes to delete

You will get a successful message soon. After that, the original songs are kept but the doubled ones is cleaned. 

successfully delete the duplicate songs

Part 3: How to Prevent Windows Media Player Double Songs in Library 

Although we can quickly remove the duplicate songs with iSunshare DupFiles Genius, it will be better if all songs will not be doubled in Windows Media Player. You can change the settings to disable this feature. 

Step 1: Launch Windows Media Player and then click Organize> Options.

Step 2: In the Option box, click on the Player tab and then uncheck the option “Automatically add it to your library when it is played”. 

Step 3: Click on Apply and then the OK button.  After that, the songs will not be doubled to Windows Media Player when played. 

How to Transfer Windows 11/10 from One SSD to Another

$
0
0

 If your SSD is running out of space and you are going to replace it with a larger one, but you do not want to lose the original Windows OS settings and configurations, what can you do? You can directly transfer Windows 11/10 from one SSD to another without reinstalling.  In this article, you can learn an easy way to do that. 

transfer Windows OS from one SSD to another

Why do you need to upgrade Windows 11 to another SSD? 

When your system runs slowly or suddenly fails to work, you can consider migrating Windows OS to another SSD. We collect the reasons below: 

  1. The old SSD is running out of space. It takes a long time to startup. Also, there is no space to install more apps. 
  2. Windows OS runs slowly on the old SSD. 
  3. You want to upgrade the computer with a larger SSD to get a better experience. 

What to prepare before cloning Windows 11/10 operating system 

First of all, you should find the Windows cloning software to transfer Windows OS to SSD. iSunshare CloneGo is a more efficient tool for you to transfer OS from one SSD to another. After cloning, it keeps the system files and configurations on both SSDs.  To begin with cloning, you need to download it and install it on your Windows computer. 

Besides, you need to get the proper SSD.  As is known to all, SSD is cheaper now. You can buy a new one with enough space. Then you need to use the USB-to-SATA adapter to connect the SSD to your computer and go to disk management to initialize it. The two SSDs should be in the same partition style. After that, you should allocate a new simple volume on the new SSD. If you get an old SSD with a larger space, it is better to back up the data on it in advance. 

Steps to transfer Windows 11/10 to another SSD 

Step 1: Launch the software and select C drive as the source partition. C drive is always the system drive. 

select C drive as source partition

Step 2: Choose the volume of your other SSD as the target partition. 

select SSD volume as target partition

Step 3: Go to click on the Start button in the bottom right corner. Then a message box comes out to inform you that the target partition data will be overwritten. Click Yes to perform the cloning. 

click Start

Wait patiently and you will get the successful prompt at the end. 

How to boot Windows 11/10 from the target SSD

After transferring Windows from one SSD to another, you can try to boot from another SSD. How to do that? Just shut down the computer and then restart it. Keep pressing the boot menu key to enter BIOS settings. Then choose the target SSD to boot. 

change boot order

FAQs about Windows OS Migration to SSD 

1.Why do so many people go to transfer Windows OS to SSD?

SSD is well-known for its excellent read and write speeds, high security, and low power consumption. With Windows OS in SSD, you can work in a faster and smoother environment. 

2.Does Windows 11/10 have the built-in tool to move Windows OS to another drive? 

No, you cannot find the direct Windows migration tool on your PC. But there is a Backup and Restore (Windows 7) utility that can help you to do that. The process is complicated as you need to back up Windows OS first to the external hard drive and then boot the computer from the Windows installation media to restore the backup to another SSD. 

3.Is it possible to clone the entire SSD to another SSD? 

Yes, you can do that with iSunshare CloneGo.  You can choose the Disk Clone feature to clone the whole SSD to another HDD/SSD or USB flash drive. 

Conclusions: 

If you are going to upgrade the Windows hard disk and worry about losing the Windows 11/10 data, you can try this Windows cloning software. It is extremely easy to transfer Windows 11/10 operating system to another SSD using iSunshare CloneGo. 

Related Articles: 

  1. How to Clone Existing Windows to USB and Make it Bootable
  2. How to Migrate Windows 11 to a New Hard Drive or SSD
  3. Easily Clone C Drive to External Hard Drive in Windows PC
  4. How to Clone SSD to Larger SSD in Windows 


Viewing all 125 articles
Browse latest View live